The first two posts about my Raspberry PI cluster (part 1 / part 2) were about the hardware, Kubernetes and deploying applications. In this post I want to talk about one of the possibilities a Kubernetes cluster offers in web software development.
When developing web software, in addition to the local environment for development and a productive environment, at least one other environment is used to test new features/functions or bug fixes before going live. In larger projects often more than one environment is used, e.g. one for the developer/test team, one for the business acceptance and one near production for load and performance tests. The number of available environments is fixed in many projects and often multiple developers deploy their work to the same environment so that their work is available to others in the team/project. If the development team only has a small number of environments available, good communication and a good deployment strategy is needed to avoid conflicts on the environments when different developers deploy their work to that environment. Often it is not always clear whether a new feature is available and on which environment.
Kubernetes makes it easy for us to deploy new services as containers. As shown in the previous post, all you have to do is tell the server node which Kubernetes objects you want to deploy and Kubernetes will take care of it. This combined with a CI/CD pipeline allows us to deploy new software versions/features automatically without being limited to a fixed number of environments. For each release, feature or bugfix, we are able to create a separate environment on demand, on which tests, reviews and functional acceptance can take place. Because each release, feature or bugfix branch has its own environment, it is always clear under which address a new release or feature can be found. In addition, such feature environments are very stable, since several developers do not deploy his work to the same environment.
Prerequisites
To create such environments, which are also called review environments, you need a Git repository, a CI/CD pipeline and a wildcard DNS record in addition to Kubernetes.
The wildcard DNS record eliminates the need to create DNS records for new environments, which simplifies dynamic provisioning of new environments. Each environment is accessible under its own subdomain, e.g. feature-x.review.example.com, release-X-Y.review.example.com.
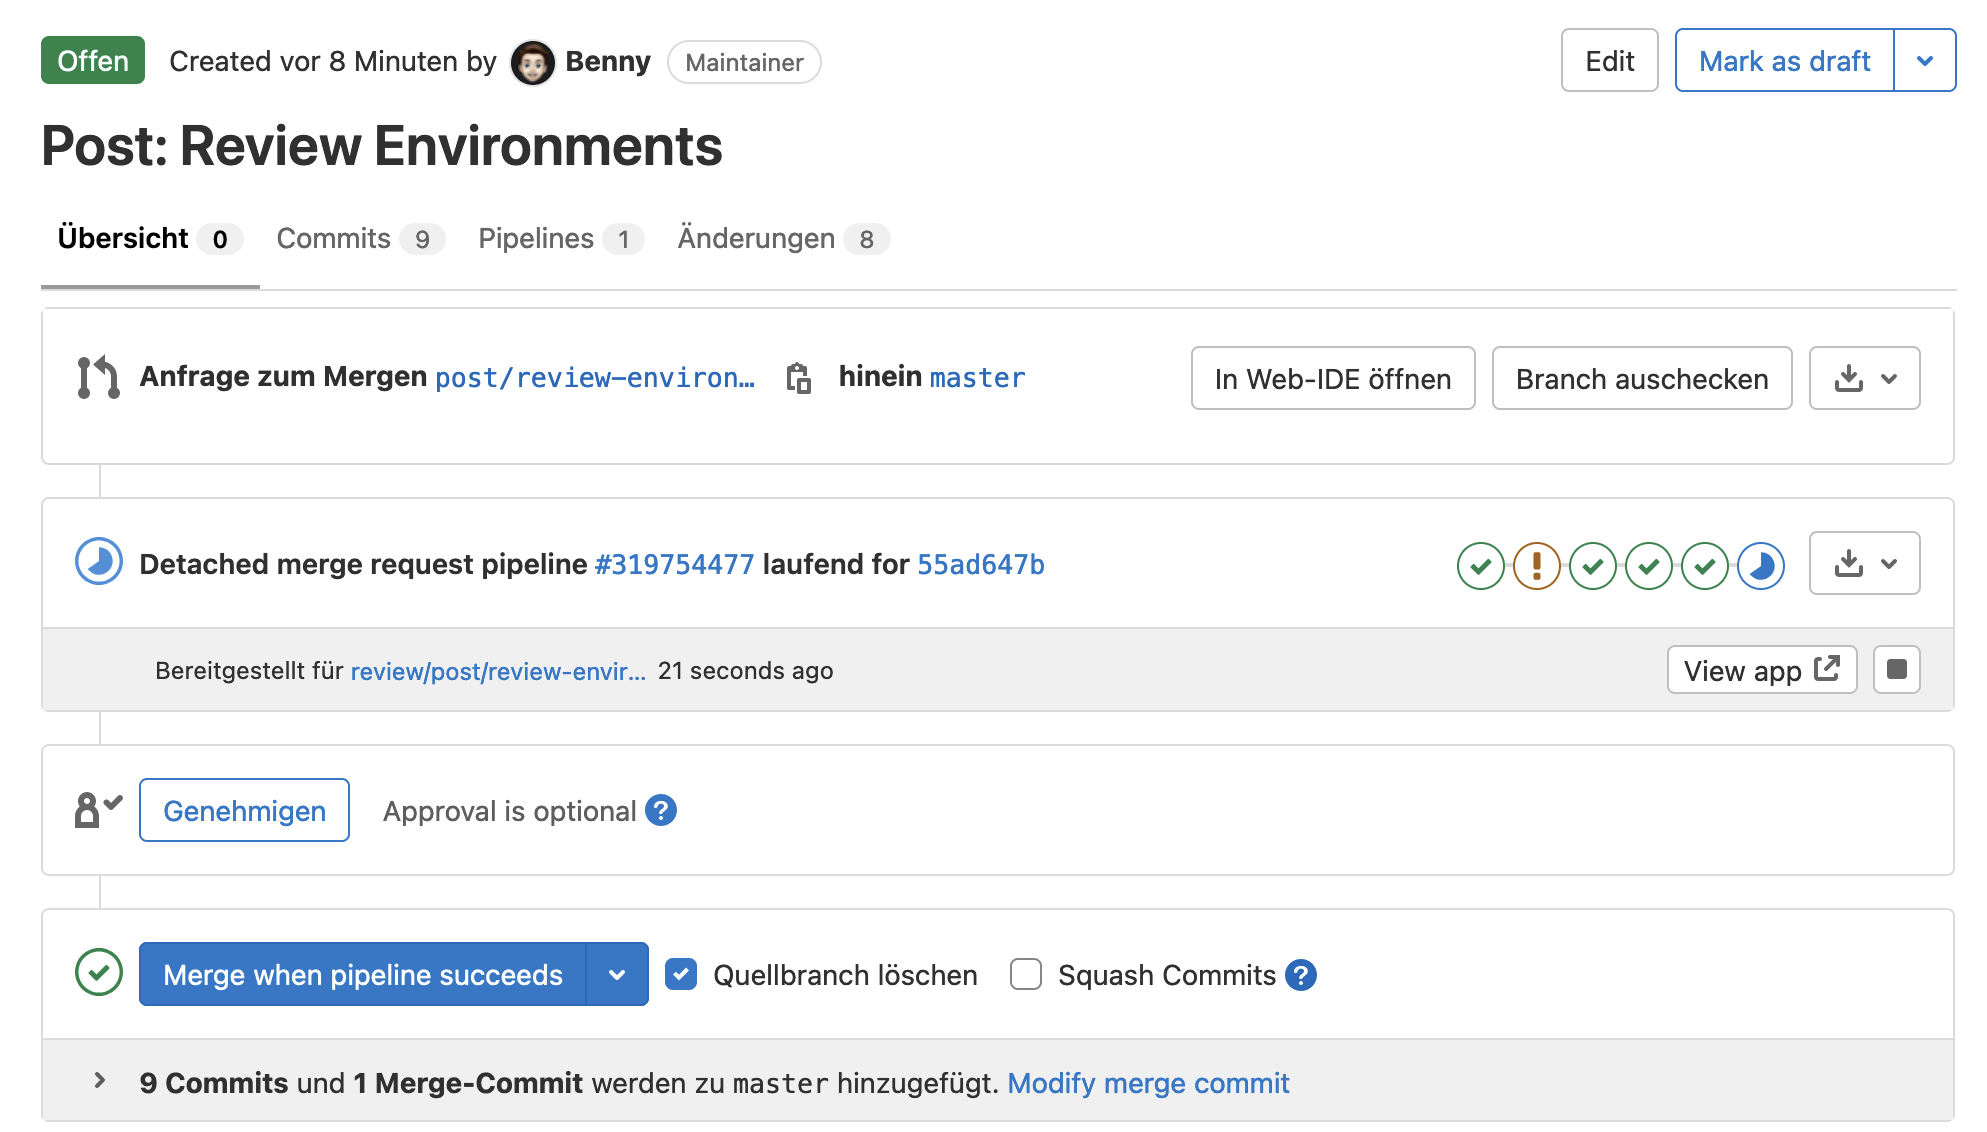
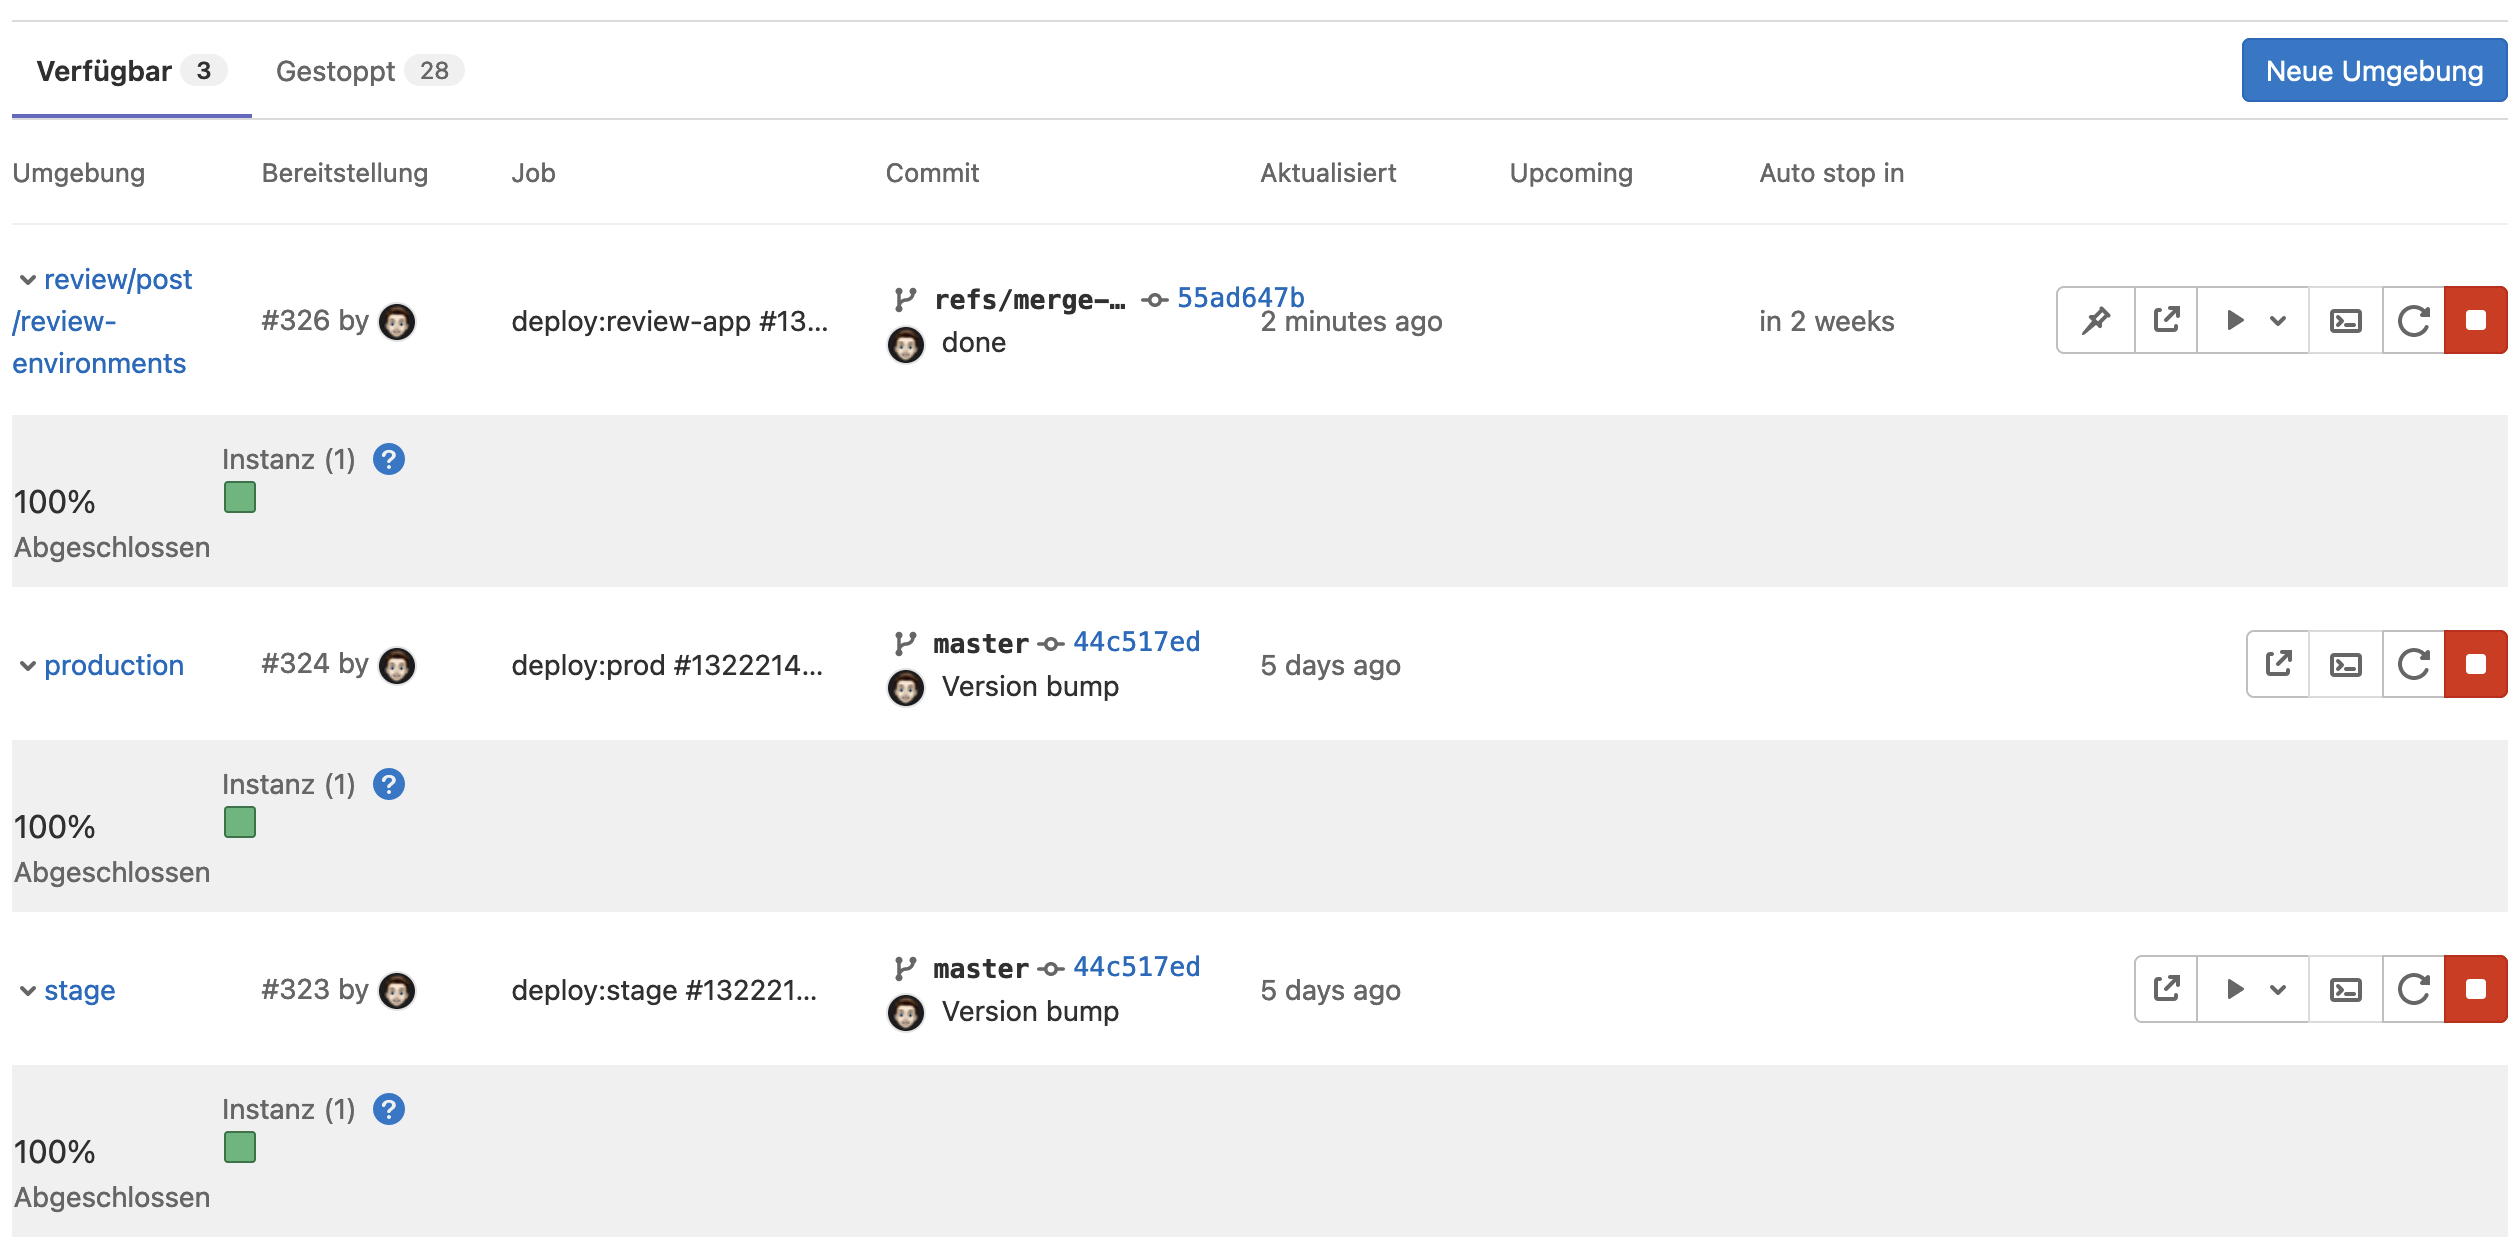
I use Gitlab as my Git repository, as this has a CI/CD pipeline and Kubernetes support already built in and there is no need to use other services. The Kubernetes support allows to communicate within the CI/CD pipeline with the cluster, show the available review environments within Kubernetes and manage them. For example, the domain of the review environments is displayed in a merge request and the review environment can be deleted automatically after the merge. A rollback to an older version can also be performed within GitLab.
Deployment strategy
Before setting everything up, you should think about a deployment strategy that fits your needs. In my example, I will keep the strategy very simple and just work with one main branch and several bugfix/feature branches in my repository. The main branch is used for the staging/acceptance environment and the prod environment. Here, any change on the main branch is automatically rolled out to the stagging environment where I can perform a quality check. After the quality check, I can roll out the same version to production via the CI/CD pipeline. If I create a merge request for a bugfix/feature branch, a review environment is automatically created for that branch where I can review the changes before merging the branch into the main branch.
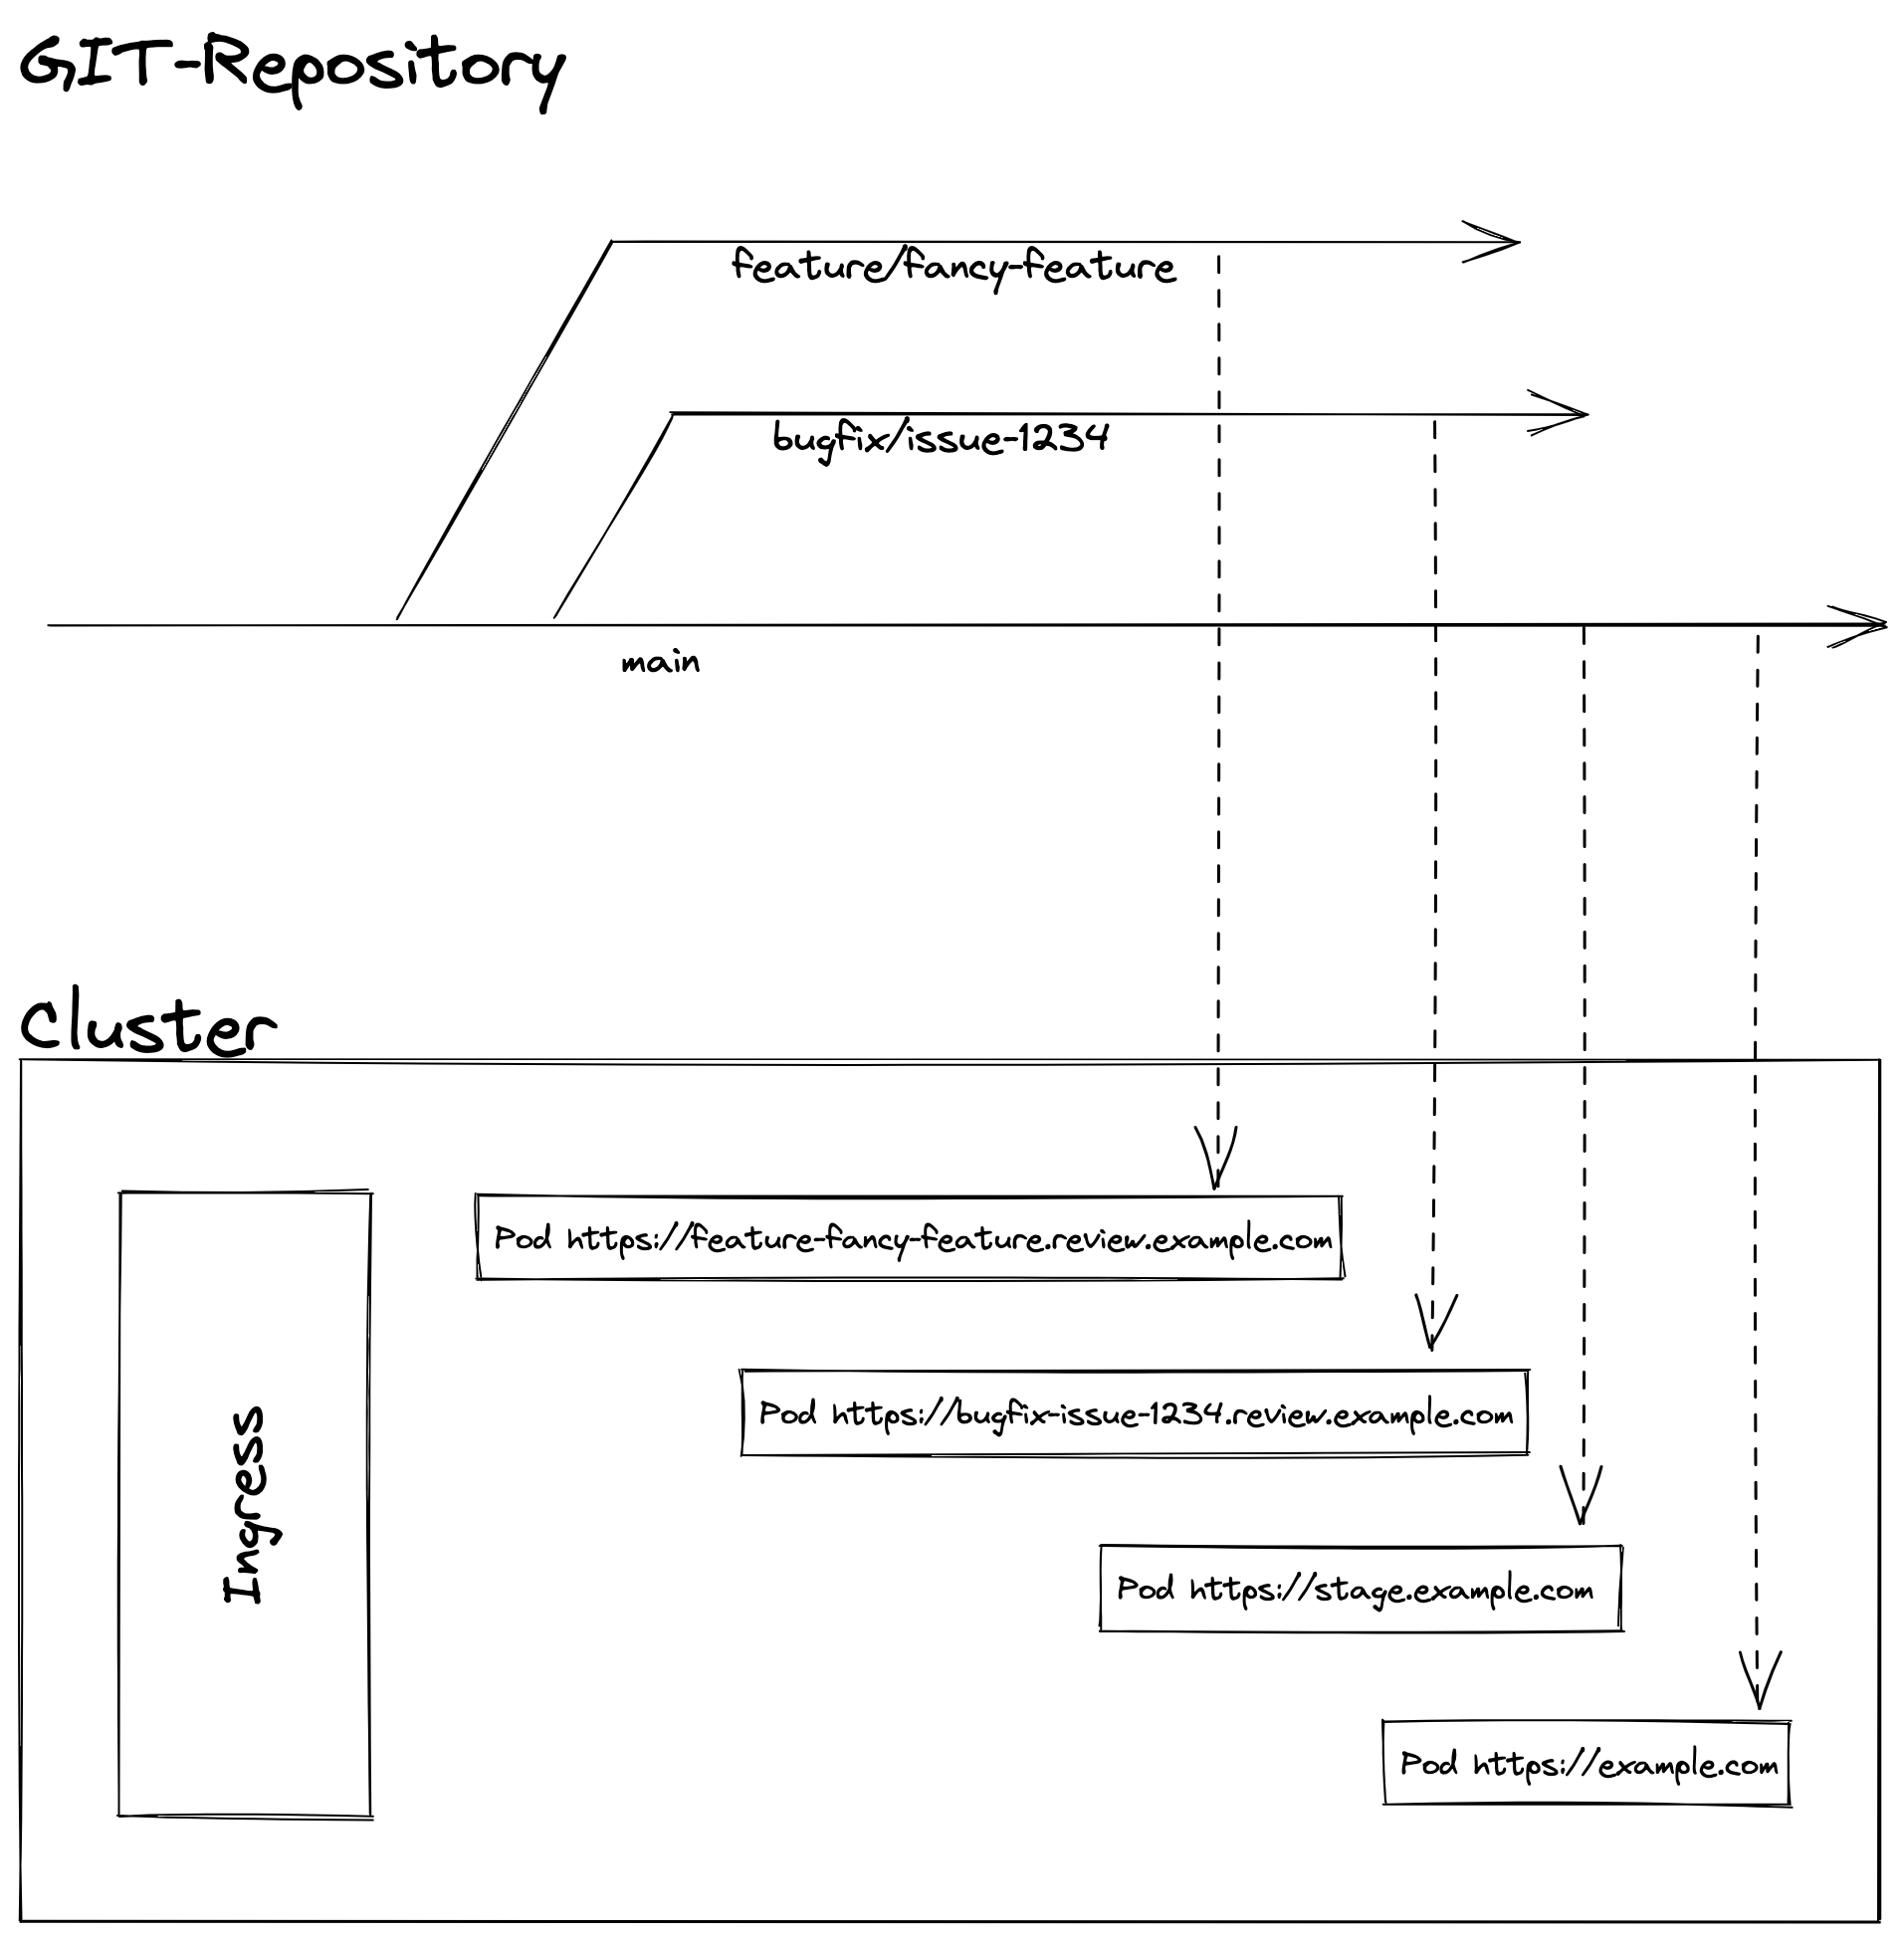
This simple strategy allows me to review new features or a bug fix in isolation and test several new features together on the staging environment before rolling them out to production.
Set up GitLab
To connect the Kubernetes cluster to GitLab, you must first set up port forwarding on the router for Kubernetes API port 6443, where the destination IP is IP of the server node. Without this port forwarding, GitLab will not be able to send commands to the cluster. If you are concerned about this port forwarding, you should consider using tools such as Argo CD. Argo CD works with a pull principle that does not require a port forwarding.
Once port forwarding is set up, follow this guide to set up administrative rights for GitLab.
In the next step, we create our container image with a CI/CD pipeline and place the image in the container registry of GitLab. To allow Kubernetes to load the image from a private container registry, we need to store access data for the container registry as a secret in the cluster. For this purpose, we create a deploy token in the repository settings in the "Repository" section, which requires at least the permission read_registry:
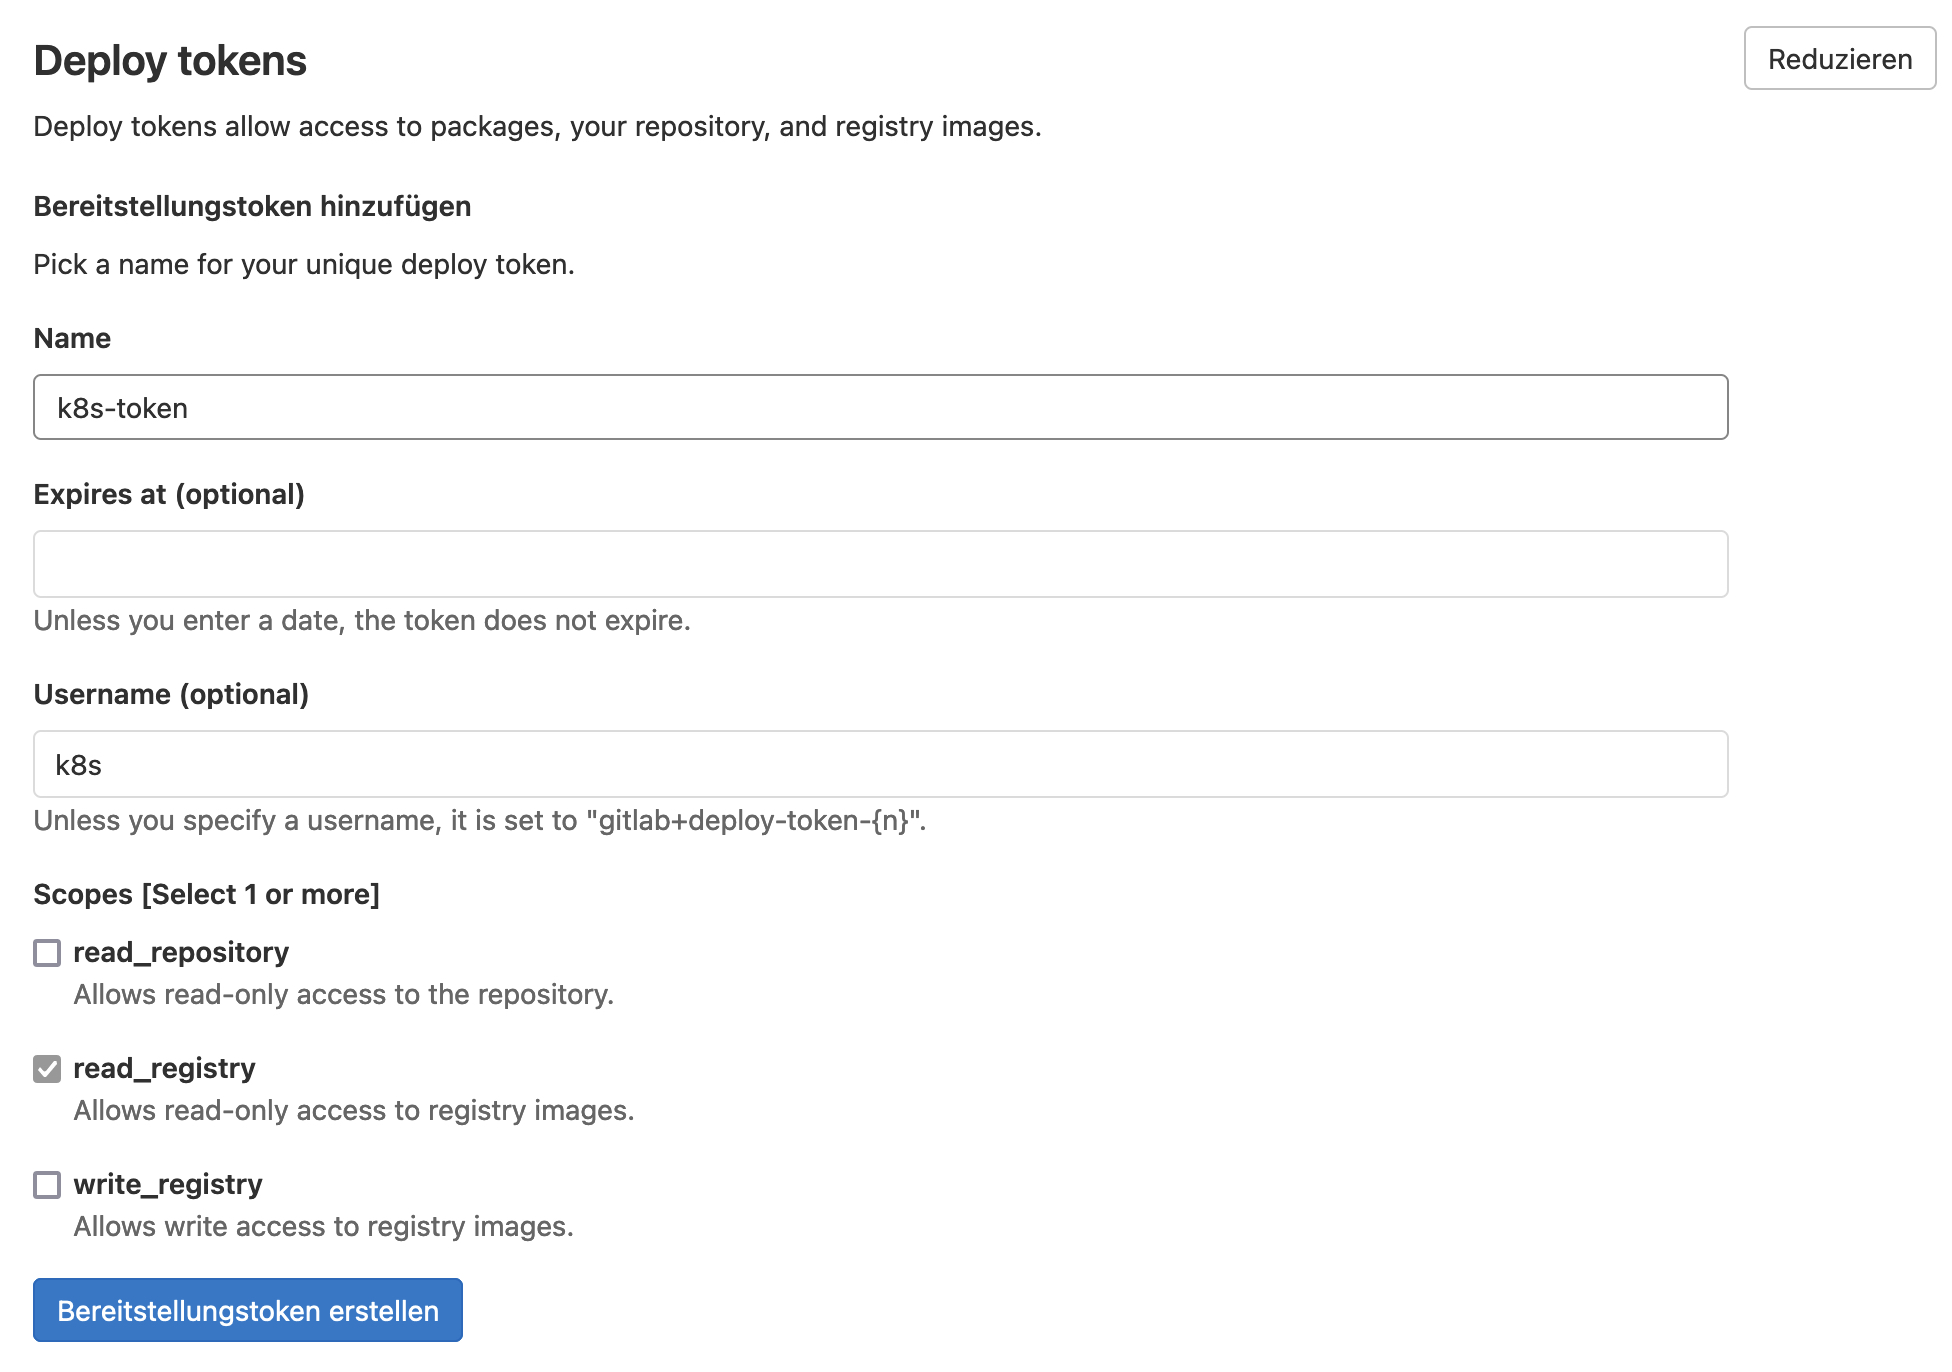
If you do not define a username for the deploy token, you have to use your own GitLab username. The credentials are stored in a secret of type dockerconfigjson:
apiVersion: v1
kind: Secret
metadata:
  name: gitlab-registry
  namespace: exampleapp-123456
type: kubernetes.io/dockerconfigjson
data:
  .dockerconfigjson: abdasdasd...
GitLab creates its own namespace for the deployment in which the secret must be stored. The namespace name contains the repository name and the repository ID, which can be found in the settings. The credentials are stored as a base64 encoded string named .dockerconfigjson. How to create this string can be found here. Once the secret has been added to the cluster, the cluster setup is completed.
Build the container
For this example, we will use a static website, built with the Nuxt.js framework. Nuxt.js is based on the single page framework VueJS and allows to pre-generate the pages. These pre-generated pages can be rendered faster by a browser, which has a positive impact on user experience and search engine ranking. To generate these static pages, one command is sufficient:
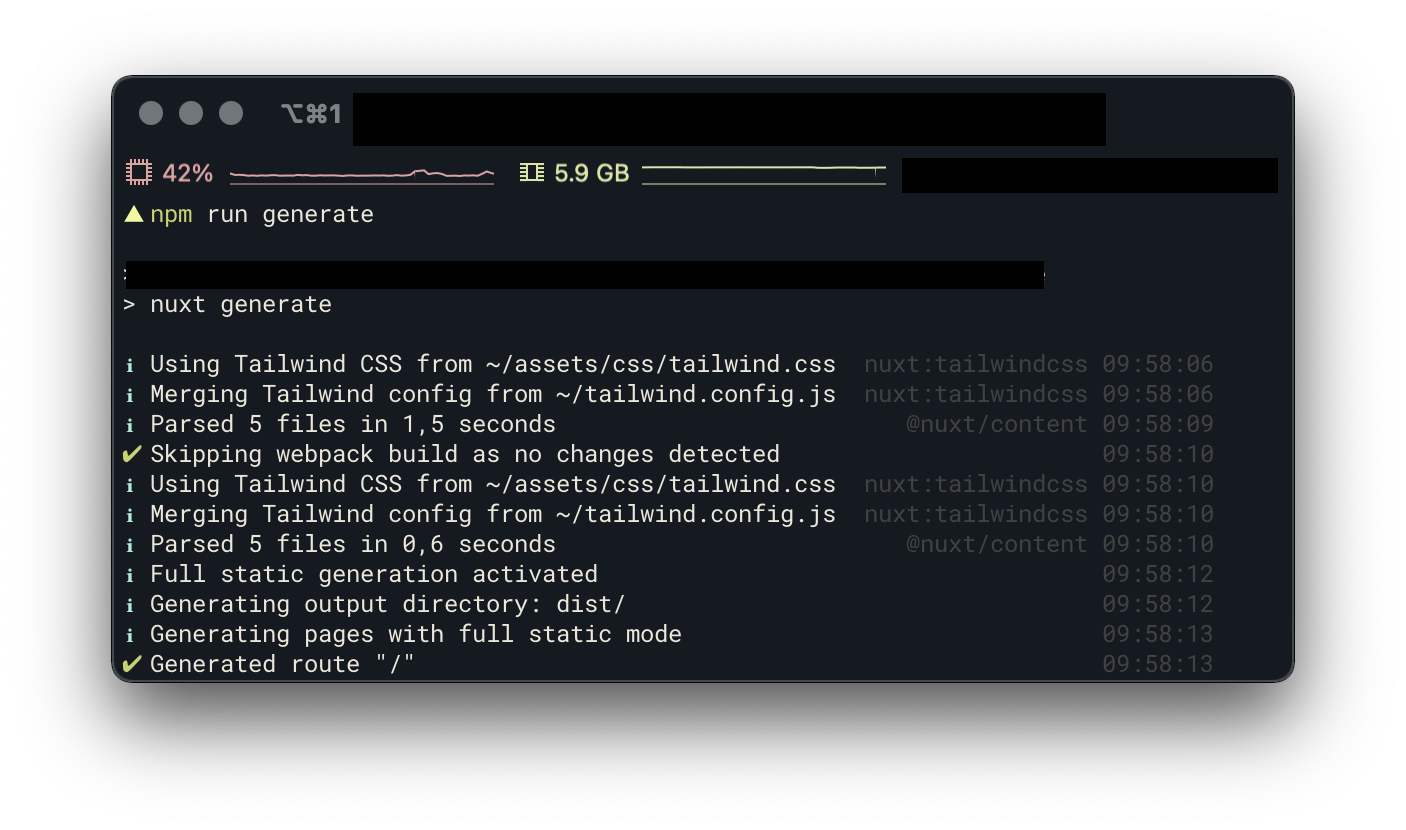
At the end of the process, the generated content is stored in the dist/ directory.
The next step is to create the container image with the web server. For this purpose it is recommended to use a base image of one of the popular web servers like nginx, apache or caddy. I decided to use the web server Caddy and create the configuration for the web server in the first step:
:80 {
  header Cache-Control max-age=21600
  header Strict-Transport-Security max-age=31536000;
  header X-Content-Type-Options nosniff
  header X-Frame-Options DENY
  header Referrer-Policy no-referrer-when-downgrade
  root * /usr/share/caddy
  encode zstd gzip
  file_server

  handle_errors {
    @404 {
        expression {http.error.status_code} == 404
    }
    rewrite @404 /404.html
    file_server
  }
}
The last step is to create the dockerfile file where we define the build steps for the image. Besides defining the base image and the port, we only need to copy the caddy configuration file and the dist directory into the image. One thing to note is that we use a variable for the target platform in the base image. We use this to build a container image in the pipeline for the Arm64 processor architecture (more on this later):
FROM --platform=$TARGETPLATFORM caddy

COPY Caddyfile /etc/caddy/Caddyfile
COPY dist /usr/share/caddy

EXPOSE 80
Define a deployment
We will write our own helmet chart for the deployment, which will allow us to override the image tag and domain within the CI/CD pipeline. Several files are required for the helmet chart, these files are placed in the helm-chart directory. Each chart needs a chart.yaml file, which contains some information about the chart:
apiVersion: v2
name: homepage
description: A Helm chart for Kubernetes

type: application

version: 1.0.0

appVersion: "1.0.0"
You can learn more about Chart.yaml here.
Next, we create the subdirectory templates in the helm-chart directory, where we place the following template files:
Certificate
For the secure operation of the environment we create TLS certificate via Let's Encrypt
{{- if eq .Values.tls true }}
apiVersion: cert-manager.io/v1alpha2
kind: Certificate
metadata:
  name: secure-{{ include "app.fullname" . }}-cert
  namespace: {{ .Release.Namespace }}
spec:
  commonName: {{ .Values.domain}}
  secretName: secure-{{ include "app.fullname" . }}-cert
  dnsNames:
    - {{ .Values.domain}}
  issuerRef:
    name: letsencrypt-prod
    kind: ClusterIssuer
{{ end }}
Deployment
In the deployment template, we specify some static and variable settings, for example, if the deployment should use a fixed number of pods or automatically spin up new pods depending on the workload to balance the load.
kind: Deployment
apiVersion: apps/v1
metadata:
  name: {{ include "app.fullname" . }}
  namespace: {{ .Release.Namespace }}
  labels:
    {{- include "app.labels" . | nindent 4 }}
  annotations:
    {{ if .Values.gitlab.app }}app.gitlab.com/app: {{ .Values.gitlab.app | quote }}{{ end }}
    {{ if .Values.gitlab.env }}app.gitlab.com/env: {{ .Values.gitlab.env | quote }}{{ end }}

spec:
  {{- if not .Values.autoscaling.enabled }}
  replicas: {{ .Values.replicaCount }}
  {{- end }}
  strategy:
    type: Recreate
    rollingUpdate: null
  selector:
    matchLabels:
      {{- include "app.selectorLabels" . | nindent 6 }}
  template:
    metadata:
      labels:
        {{- include "app.selectorLabels" . | nindent 8 }}
      annotations:
        {{ if .Values.gitlab.app }}app.gitlab.com/app: {{ .Values.gitlab.app | quote }}{{ end }}
        {{ if .Values.gitlab.env }}app.gitlab.com/env: {{ .Values.gitlab.env | quote }}{{ end }}
    spec:
      {{- with .Values.imagePullSecrets }}
      imagePullSecrets:
        {{- toYaml . | nindent 8 }}
      {{- end }}
      containers:
        - name: {{ .Chart.Name }}
          image: "{{ .Values.image.repository }}:{{ .Values.image.tag | default .Chart.AppVersion }}"
          imagePullPolicy: {{ .Values.image.pullPolicy }}
          resources:
{{ toYaml .Values.resources | indent 12 }}
          ports:
            - name: http
              containerPort: 80
              protocol: TCP
          readinessProbe:
            httpGet:
              path: /
              port: http
          livenessProbe:
            httpGet:
              path: /
              port: http
            initialDelaySeconds: 5
            periodSeconds: 30
            failureThreshold: 3
HorizontalPodAutoscaler
As mentioned above, a HorizontalPodAutoscaler has to be created for the autoscaling. However, this is only created if the autoscaling option for the deployment has been set to active.
{{- if .Values.autoscaling.enabled }}
apiVersion: autoscaling/v2beta1
kind: HorizontalPodAutoscaler
metadata:
  name: {{ include "app.fullname" . }}
  namespace: {{ .Release.Namespace }}
  labels:
    {{- include "app.labels" . | nindent 4 }}
spec:
  scaleTargetRef:
    apiVersion: apps/v1
    kind: Deployment
    name: {{ include "app.fullname" . }}
  minReplicas: {{ .Values.autoscaling.minReplicas }}
  maxReplicas: {{ .Values.autoscaling.maxReplicas }}
  metrics:
    {{- if .Values.autoscaling.targetCPUUtilizationPercentage }}
    - type: Resource
      resource:
        name: cpu
        targetAverageUtilization: {{ .Values.autoscaling.targetCPUUtilizationPercentage }}
    {{- end }}
    {{- if .Values.autoscaling.targetMemoryUtilizationPercentage }}
    - type: Resource
      resource:
        name: memory
        targetAverageUtilization: {{ .Values.autoscaling.targetMemoryUtilizationPercentage }}
    {{- end }}
{{- end }}
Service and IngressRoute
To make our deployment reachable from outside of the cluster, we need to define a service and an ingress route. In addition to an IngressRoute for the HTTPS endpoint, we also create one for the HTTP endpoint, which is redirected to the HTTPS endpoint via a middleware.
apiVersion: v1
kind: Service
metadata:
  name: {{ include "app.fullname" . }}
  namespace: {{ .Release.Namespace }}
  labels:
    {{- include "app.labels" . | nindent 4 }}

spec:
  ports:
    - protocol: TCP
      name: http
      port: {{ .Values.service.port }}
      targetPort: http
  selector:
    {{- include "app.selectorLabels" . | nindent 4 }}
apiVersion: traefik.containo.us/v1alpha1
kind: IngressRoute
metadata:
  name: {{ include "app.fullname" . }}-http
  namespace: {{ .Release.Namespace }}
  labels:
    {{- include "app.labels" . | nindent 4 }}

spec:
  entryPoints:
    - web
  routes:
    - match: Host(`{{ .Values.domain}}`)
      kind: Rule
      services:
        - name: {{ include "app.fullname" . }}
          port: {{ .Values.service.port }}
      middlewares:
      - name: https-only
        namespace: kube-system
---
{{- if eq .Values.tls true }}
apiVersion: traefik.containo.us/v1alpha1
kind: IngressRoute
metadata:
  name: {{ include "app.fullname" . }}-https
  namespace: {{ .Release.Namespace }}
  labels:
    {{- include "app.labels" . | nindent 4 }}

spec:
  entryPoints:
    - websecure
  routes:
    - match: Host(`{{ .Values.domain}}`)
      kind: Rule
      services:
        - name: {{ include "app.fullname" . }}
          port: {{ .Values.service.port }}
      middlewares:
      - name: public-secured
        namespace: kube-system
  tls:
    secretName: secure-{{ include "app.fullname" . }}-cert
{{ end }}
Helper
Template files are YAML files in which variables and conditions can be used to dynamically customize the content. Some of these variables are generated via a helper (_helpers.tpl), such as the selectorLabels or the app name. The other variables are defined in a Values-YAML.
{{/*
Expand the name of the chart.
*/}}
{{- define "app.name" -}}
{{- default .Chart.Name .Values.nameOverride | trunc 63 | trimSuffix "-" }}
{{- end }}

{{/*
Create a default fully qualified app name.
We truncate at 63 chars because some Kubernetes name fields are limited to this (by the DNS naming spec).
If release name contains chart name it will be used as a full name.
*/}}
{{- define "app.fullname" -}}
{{- if .Values.fullnameOverride }}
{{- .Values.fullnameOverride | trunc 63 | trimSuffix "-" }}
{{- else }}
{{- $name := default .Chart.Name .Values.nameOverride }}
{{- if contains $name .Release.Name }}
{{- .Release.Name | trunc 63 | trimSuffix "-" }}
{{- else }}
{{- printf "%s-%s" .Release.Name $name | trunc 63 | trimSuffix "-" }}
{{- end }}
{{- end }}
{{- end }}

{{/*
Create chart name and version as used by the chart label.
*/}}
{{- define "app.chart" -}}
{{- printf "%s-%s" .Chart.Name .Chart.Version | replace "+" "_" | trunc 63 | trimSuffix "-" }}
{{- end }}

{{/*
Common labels
*/}}
{{- define "app.labels" -}}
helm.sh/chart: {{ include "app.chart" . }}
{{ include "app.selectorLabels" . }}
{{- if .Chart.AppVersion }}
app.kubernetes.io/version: {{ .Chart.AppVersion | quote }}
{{- end }}
app.kubernetes.io/managed-by: {{ .Release.Service }}
{{- end }}

{{/*
Selector labels
*/}}
{{- define "app.selectorLabels" -}}
app.kubernetes.io/name: {{ include "app.name" . }}
app.kubernetes.io/instance: {{ .Release.Name }}
{{- end }}
Values-YAML
We will create for our setup a separate Values-YAML file for the Prod, Stage and Review environment(s):
autoscaling:
  enabled: true
  minReplicas: 1
  maxReplicas: 3
  targetCPUUtilizationPercentage: 80

resources:
  limits:
    cpu: 300m
    memory: 256Mi
  requests:
    cpu: 100m
    memory: 128Mi

image:
  repository: registry.gitlab.com/USERNAME/REPO
  pullPolicy: Always
  tag: "latest"

domain: example.com

imagePullSecrets:
  - name: gitlab-registry

tls: true

service:
  port: 80

gitlab:
  env:
  app:
replicaCount: 1
autoscaling:
enabled: false
resources:
limits:
cpu: 100m
memory: 128Mi
requests:
cpu: 100m
memory: 64Mi
image:
repository: registry.gitlab.com/USERNAME/REPO
pullPolicy: Always
tag: ""
domain: stage.example.com
imagePullSecrets:
- name: gitlab-registry
tls: true
service:
port: 80
gitlab:
env:
app:replicaCount: 1
autoscaling:
enabled: false
resources:
limits:
cpu: 100m
memory: 128Mi
requests:
cpu: 100m
memory: 64Mi
image:
repository: registry.gitlab.com/USERNAME/REPO
pullPolicy: Always
tag: ""
imagePullSecrets:
- name: gitlab-registry
domain:
tls: true
service:
port: 80
gitlab:
env:
app:These three files are mostly identical, the only differences are in the replicaCount, autoscaling, resources and domain settings.
Create pipeline
GitLab pipelines are defined in .gitlab-ci.yml, which has to be located in the root directory of the Git repository.
First of all, we define some variables, including one for our target platform Arm64:
variables:
  DOCKER_HOST: tcp://docker:2375/
  DOCKER_DRIVER: overlay2
  DOCKER_TLS_CERTDIR: ""
  PLATFORM: linux/arm64/v8
GitLab provides some predefined templates, such as for a code quality analysis or security scans, which we can integrate into our pipeline. Another useful template is the template Workflows/MergeRequest-Pipelines.gitlab-ci.yml, which ensures that the pipeline is only triggered if a merge request exists for a branch or the change was made on the main branch:
include:
- template: Workflows/MergeRequest-Pipelines.gitlab-ci.yml
- template: Code-Quality.gitlab-ci.yml
- template: Dependency-Scanning.gitlab-ci.yml
- template: Security/SAST.gitlab-ci.yml
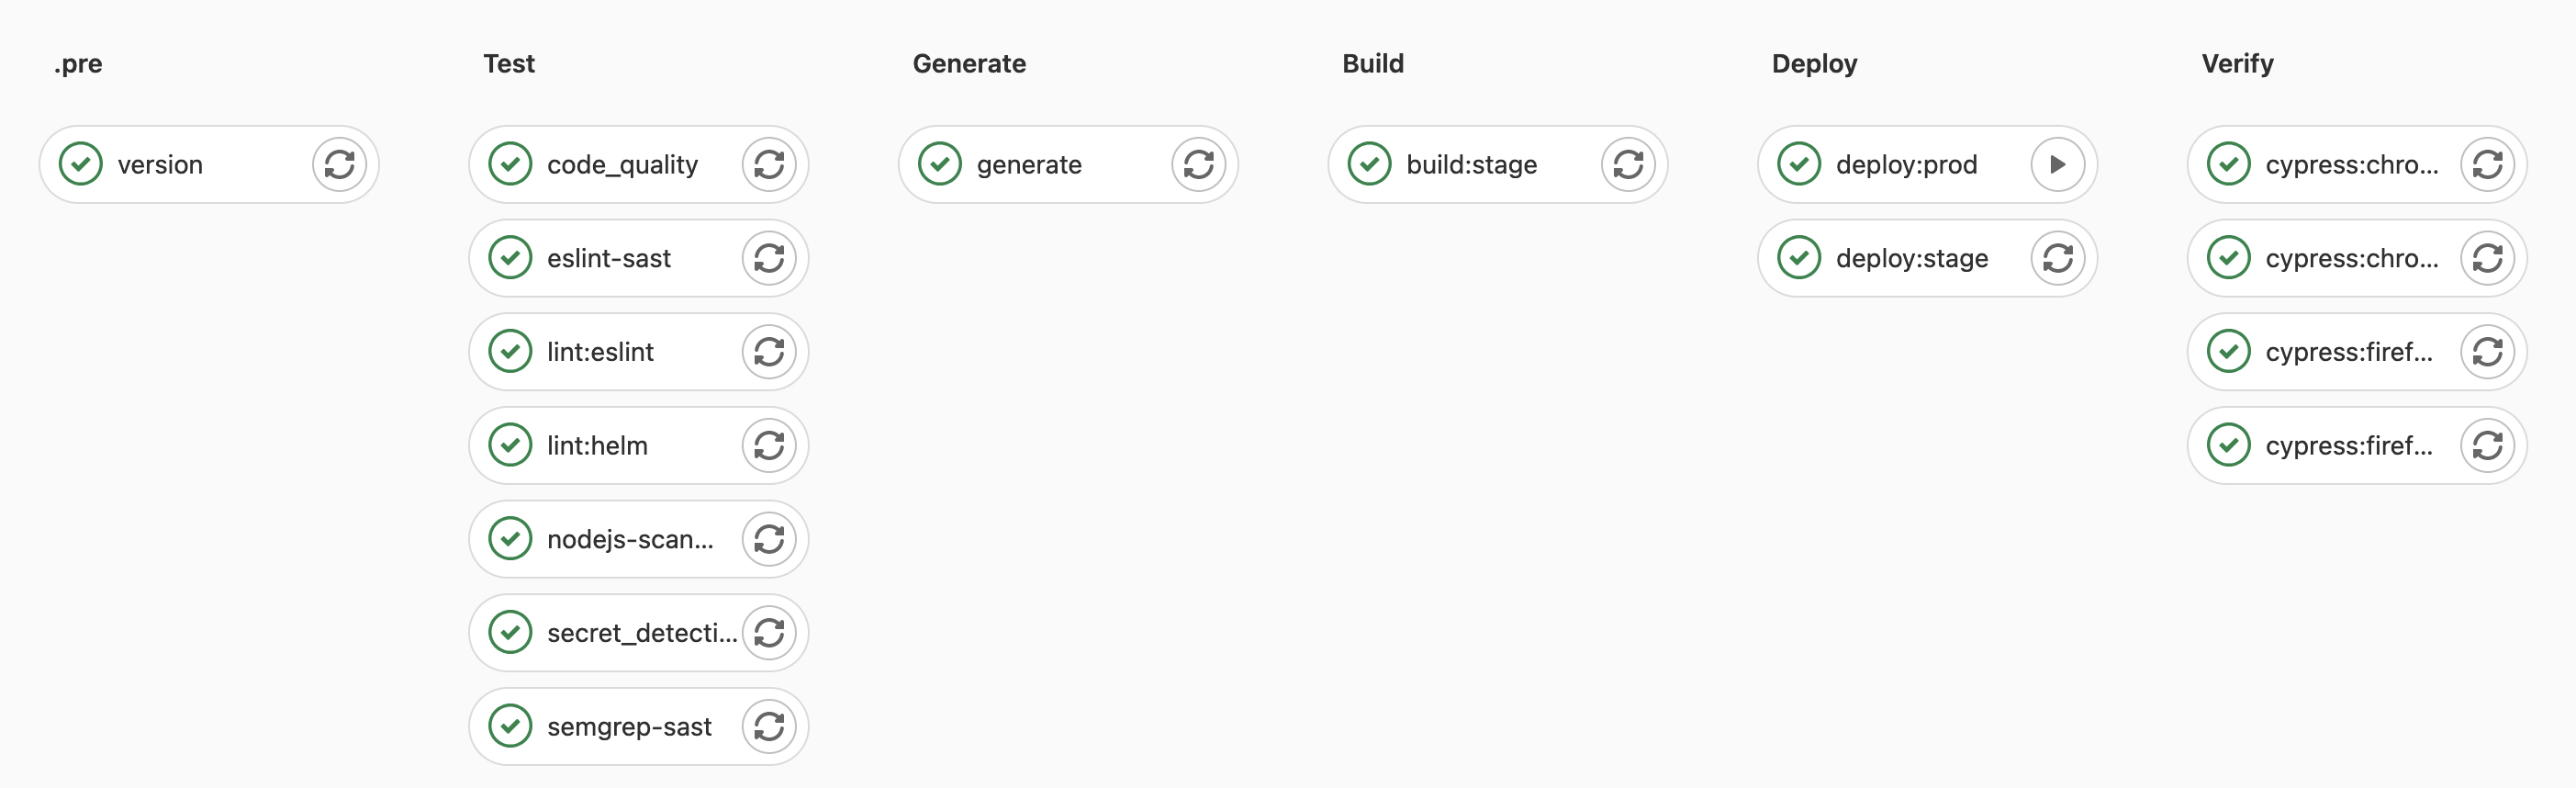
- template: Security/Secret-Detection.gitlab-ci.ymlWe will define 7 stages for the pipeline, which will be run in sequence:
stages:
  - .pre
  - test
  - generate
  - build
  - release
  - deploy
  - verify
To tag the container image with the correct version number, we extract the version number from the package.json file and store it in the build.env file, which is available to subsequent jobs:
version:
  stage: .pre
  image: node:lts
  script:
    - export VERSION=$(node -p "require('./package.json').version")
    - echo "BUILD_VERSION=$VERSION" >> build.env
  artifacts:
    reports:
      dotenv: build.env
Next, we define the Test Stage, where we perform some linter checks and tests:
lint:eslint:
  stage: test
  image: node:lts
  script:
    - npm ci
    - npm run lint

lint:helm:
  image: dtzar/helm-kubectl
  stage: test
  script:
    - helm lint ./helm-data

test:nuxt-components:
  image: node:lts
  stage: test
  script:
    - npm ci
    - npm run test
After successful tests, we generate the static pages:
generate:
  stage: generate
  image: node:lts
  script:
    - npm ci
    - NODE_ENV=production
    - npm run generate
  artifacts:
    paths:
      - dist/
    expire_in: 2 days
After the static pages are generated, we create the container image. For this we have two different jobs which have different rules.
The first job is executed only on the main branch and generates the stage/prod image and the second job is executed only when a merge request exists and creates the image for the review environments. The stage/prod image gets the version number as tag and the tag latest. For the review environments we use the commit-ref-slug as image tag.
To make the image run on the Arm64 platform, we use the experimental buildx command instead of Docker's normal build command, which gives us the ability to build images for multiple platforms. After building the image, we push it to GitLab's internal container registry:
build:stage:
  stage: build
  image: jonoh/docker-buildx-qemu
  services:
    - docker:dind
  before_script:
    - docker login -u gitlab-ci-token -p $CI_BUILD_TOKEN registry.gitlab.com
    - docker buildx create --driver docker-container --use
  script:
    - update-binfmts --enable
    - docker buildx build
      --push
      -t $CI_REGISTRY_IMAGE:v$BUILD_VERSION
      --platform $PLATFORM .
    - docker pull $CI_REGISTRY_IMAGE:v$BUILD_VERSION
    - docker tag $CI_REGISTRY_IMAGE:v$BUILD_VERSION $CI_REGISTRY_IMAGE:latest
    - docker push $CI_REGISTRY_IMAGE:latest
  needs:
    - generate
  rules:
    - if: '$CI_COMMIT_BRANCH == "main"'

build:review-app:
  stage: build
  image: jonoh/docker-buildx-qemu
  services:
    - docker:dind
  before_script:
    - docker login -u gitlab-ci-token -p $CI_BUILD_TOKEN registry.gitlab.com
    - docker buildx create --driver docker-container --use
  script:
    - update-binfmts --enable
    - docker buildx build
      --push
      -t "$CI_REGISTRY_IMAGE:review-$CI_COMMIT_REF_SLUG"
      --platform $PLATFORM .
  needs:
    - generate
  rules:
    - if: $CI_MERGE_REQUEST_ID
We will now deploy the created image to Kubernetes using the Helm Chart we created earlier. We use the created Value-YAML files as a baseline, but overwrite some values like the image tag and the domain. Via the Environment settings we provide GitLab with the name and URL of the environment. In the deployment for the review environments, we also define which job will stop the environment and that the environment should automatically stop after 3 weeks. As the Prod deployment should only be triggered after a quality check on the Stage environment, we define a rule for the Prod deployment that turns the job into a manual job:
deploy:review-app:
  image: lwolf/helm-kubectl-docker
  stage: deploy
  environment:
    name: review/$CI_COMMIT_REF_NAME
    on_stop: stop_review_app
    auto_stop_in: 3 week
    url: https://$CI_COMMIT_REF_SLUG.review.example.com
  script:
    - echo "$KUBE_NAMESPACE"
    - helm upgrade
      --install
      --namespace $KUBE_NAMESPACE
      --create-namespace
      --atomic
      --timeout 3m
      --set image.tag=review-$CI_COMMIT_REF_SLUG
      --set domain=$CI_COMMIT_REF_SLUG.review.example.com
      --set gitlab.app=$CI_PROJECT_PATH_SLUG
      --set gitlab.env=$CI_ENVIRONMENT_SLUG
      homepage-$CI_COMMIT_REF_SLUG
      ./helm-data
    - helm test --namespace $KUBE_NAMESPACE homepage-$CI_COMMIT_REF_SLUG
  needs:
    - build:review-app
  rules:
    - if: $CI_MERGE_REQUEST_ID

deploy:stage:
  image: lwolf/helm-kubectl-docker
  stage: deploy
  environment:
    name: stage
    url: https://stage.example.com
  script:
    - helm upgrade
      --install
      --namespace $KUBE_NAMESPACE
      --create-namespace
      --atomic
      --timeout 60s
      -f ./helm-data/values.stage.yaml
      --set image.tag=v$BUILD_VERSION
      --set gitlab.app=$CI_PROJECT_PATH_SLUG
      --set gitlab.env=$CI_ENVIRONMENT_SLUG
      homepage-stage
      ./helm-data
    - helm test --namespace $KUBE_NAMESPACE homepage-stage
  needs:
    - build:stage
  rules:
    - if: '$CI_COMMIT_BRANCH == "main"'

deploy:prod:
  image: lwolf/helm-kubectl-docker
  stage: deploy
  environment:
    name: production
    url: https://example.com
  script:
    - helm upgrade
      --install
      --namespace $KUBE_NAMESPACE
      --create-namespace
      --atomic
      --timeout 60s
      -f ./helm-data/values.prod.yaml
      --set image.tag=v$BUILD_VERSION
      --set gitlab.app=$CI_PROJECT_PATH_SLUG
      --set gitlab.env=$CI_ENVIRONMENT_SLUG
      homepage-prod
      ./helm-data
    - helm test --namespace $KUBE_NAMESPACE homepage-prod
  needs:
    - build:stage
  rules:
    - if: '$CI_COMMIT_BRANCH == "main"'
      when: manual
      allow_failure: true
Once the deployment is completed, we verify the deployment by running some Cypress E2E front-end tests. For the tests we use the Chrome and Firefox browsers:
cypress:chrome:review-app:
  stage: verify
  image: cypress/browsers:node12.18.3-chrome87-ff82
  script:
    - export CYPRESS_BASE_URL="https://$CI_COMMIT_REF_SLUG.review.example.com"
    - npx cypress run -b chrome --headless
  artifacts:
    name: "$CI_JOB_NAME-$CI_COMMIT_REF_NAME"
    when: on_failure
    expire_in: 3 days
    paths:
      - $PWD/cypress/screenshots
  rules:
    - if: $CI_MERGE_REQUEST_ID

cypress:firefox:review-app:
  stage: verify
  image: cypress/browsers:node12.18.3-chrome87-ff82
  script:
    - export CYPRESS_BASE_URL="https://$CI_COMMIT_REF_SLUG.review.example.com"
    - npx cypress run -b firefox --headless
  artifacts:
    name: "$CI_JOB_NAME-$CI_COMMIT_REF_NAME"
    when: on_failure
    expire_in: 3 days
    paths:
      - $PWD/cypress/screenshots
  rules:
    - if: $CI_MERGE_REQUEST_ID

cypress:chrome:stage:
  stage: verify
  image: cypress/browsers:node12.18.3-chrome87-ff82
  script:
    - export CYPRESS_BASE_URL="https://stage.example.com"
    - npx cypress run -b chrome --headless
  artifacts:
    name: "$CI_JOB_NAME-$CI_COMMIT_REF_NAME"
    when: on_failure
    expire_in: 3 days
    paths:
      - $PWD/cypress/screenshots
  rules:
    - if: '$CI_COMMIT_BRANCH == "main"'

cypress:firefox:stage:
  stage: verify
  image: cypress/browsers:node12.18.3-chrome87-ff82
  script:
    - export CYPRESS_BASE_URL="https://stage.example.com"
    - npx cypress run -b firefox --headless
  artifacts:
    name: "$CI_JOB_NAME-$CI_COMMIT_REF_NAME"
    when: on_failure
    expire_in: 3 days
    paths:
      - $PWD/cypress/screenshots
  rules:
    - if: '$CI_COMMIT_BRANCH == "main"'

cypress:chrome:prod:
  stage: verify
  image: cypress/browsers:node12.18.3-chrome87-ff82
  script:
    - export CYPRESS_BASE_URL="https://example.com"
    - npx cypress run -b chrome --headless
  artifacts:
    name: "$CI_JOB_NAME-$CI_COMMIT_REF_NAME"
    when: on_failure
    expire_in: 3 days
    paths:
      - $PWD/cypress/screenshots
  rules:
    - if: '$CI_COMMIT_BRANCH == "main"'
  needs:
    - deploy:prod

cypress:firefox:prod:
  stage: verify
  image: cypress/browsers:node12.18.3-chrome87-ff82
  script:
    - export CYPRESS_BASE_URL="https://example.com"
    - npx cypress run -b firefox --headless
  artifacts:
    name: "$CI_JOB_NAME-$CI_COMMIT_REF_NAME"
    when: on_failure
    expire_in: 3 days
    paths:
      - $PWD/cypress/screenshots
  rules:
    - if: '$CI_COMMIT_BRANCH == "main"'
  needs:
    - deploy:prod
The last job in the pipeline is for stopping the review environment, which we have referenced already in the deployment job of the review environment:
stop_review_app:
  image: lwolf/helm-kubectl-docker
  allow_failure: true
  variables:
    GIT_STRATEGY: none
  stage: verify
  environment:
    name: review/$CI_COMMIT_REF_NAME
    action: stop
    url: $CI_COMMIT_REF_SLUG.review.example.com
  script:
    - helm delete homepage-$CI_COMMIT_REF_SLUG
  rules:
    - if: $CI_MERGE_REQUEST_ID
      when: manual
Done 🎉 From now on, each release, feature, bugfix branch is deployed to its own review environment as soon as a merge request is created for this branch.
The sub-subdomain for this environment is build by the slug text of the branch name and the subdomain review.example.com, e.g. feature-contact-form.review.example.com.

Conclusion
Kubernetes is becoming more and more important in the operation of web applications and also offers completely new possibilities in the area of software development. The provision of review environments on demand is only one of these possibilities, which brings some advantages in web development. Especially for larger projects/teams, review environments can have some benefits, such as isolated testing of new releases or new features.
However, not everything is as easy as it seems at first look. In our example it was a very simple deployment and in reality such deployments look much more complex and consume much more resources than a simple static site. Creating new environments on demand can increase the load/costs very fast. It is recommended to limit the usable resources for a deployment or namespace to have a better control. Everyone has to decide for themselves whether the benefits of such a review environment are worth it, but this post should have provided a good first insight into how such a setup can look and what possibilities such a setup offers.