I have been using Docker Containers for several years now in the development and operation of applications and I am very impressed by this technology. With containers, you can get your own applications, as well as any third-party application, up and running on any server in seconds. You don't have to worry about dependent libraries, different software versions and running multiple applications in parallel on one system, because each application works isolated in its own container.
Besides my own homepage, a few hobby projects and a blog for my travels, I also run some applications that I need for my work as an IT consultant in parallel on a rented vServer via Docker container. In addition to these public applications, I have a first generation Raspberry Pi running at home, on which I run the ad blocker PiHole and the smart home application Homebridge.
I've been interested in the topic of container orchestration via Kubernetes for a while now and have tried to dive into it several times. But since I didn't have the right hardware or didn't want to rent three vServers just to play around, I didn't have the opportunity to put the theory into practice. The topic Kubernetes was only slightly observed by me on the edge and I stayed with my Docker or Docker Compose setup.
At the end of 2020 I read a blog post about running Kubernetes with three Raspberry Pis. My interest was renewed and I did some more research on the topic and found out that the 4th generation Raspberry Pi is also available with 4 and 8 GB of memory and new Kubernetes distributions have been developed that run on ARM processors and only take up a few resources. The entry barrier for Kubernetes didn't seem that high anymore, so I ordered my first 4th generation Raspberry Pi and started running a single-node Kubernetes on it. In the following weeks, I added a second and then a third Raspberry Pi. I noticed very quickly that there was something different about working with more than one node. Things like persistent storage or port forwarding on the router work differently in a multi-node cluster setup.
During the last weeks I have been building my own Kubernetes cluster at home to replace my rented server and my 1st generation Raspberry Pi with the cluster. During this process I had to completely reinstall the cluster once or twice and was spending hours analyzing errors. The cluster has been running stable for about 2 weeks now and I was able to solve all problems.
Even if the entry barrier for your own Kubernetes cluster at home is not that high as it was 1-2 years ago, there are still some tricky situations and you have to do a lot of error analysis. To help others benefit from my experience and not make the same mistakes I did, I wanted to address the topic of Raspberry Pi clusters in a series of posts on my website and bring it closer to others. I will not talk so much about the theory of Kubernetes, since there is already a lot of literature and videos available, but will rather write about the steps and software needed to run Kubernetes based on the Raspberry Pi.
For whom is this series and which skills are required?
This series is for those who are interested in Kubernetes like me, have fun trying out new technologies and plan to host various applications at home. From a website to a smart home application, nearly everything can be run in your own Raspberry Pi cluster at home. Even if I try to describe everything in detail, I assume basic skills in Linux, networking and Docker. If you don't have any experience with Docker, you should start with a simple setup based on Docker and Docker-Compose.
Hardware
I use the 4th generation Raspberry Pi as hardware for the cluster and there are several reasons for this. On the one hand a Raspberry Pi is not expensive and with a power consumption of 3-5 Watts it is also very cheap when it comes to maintenance costs, but also the space requirement makes the Raspberry Pi very attractive. My cluster, made up of three Raspberry PIs in one case, needs only some centimeters of space and can be placed everywhere (currently in the wine rack 🍷 from IKEA).

Besides the Raspberry Pi itself, there are a few things to consider with the rest of the hardware. Let's start with the power supply:
The Raspberry Pi 4 is powered by USB-C and a multi-port power supply would be ideal in this case. However, there are not many power supplies that provide the necessary 3A/5V on multiple ports at the same time and by using a multi-port power supply, there is a risk that the whole cluster will be down if the power supply is not working anymore. For this reason I chose the official power supply from the Raspberry Pi.
The next point that has to be considered when choosing the hardware is the used storage. Normally you use a MicroSD card for the Raspberry Pi, where the operating system is running on and where all data are stored. But I often read on the internet that SD cards are very unreliable and therefore not suitable for cluster long-term operation. Since 2020, the Raspberry Pi supports booting from USB, which is why I use a USB flash drive instead of a MicroSD card. Besides the better reliability, USB 3.1 flash drives also have a higher performance compared to MicroSD cards. And performance is an important factor in a cluster where data needs to be synchronized quickly between multiple nodes. I initially chose slow memory sticks, which resulted in a very unreliable cluster. After I realized my mistake, I switched to faster flash drives and my cluster is now running without any problems. For the memory size, I decided on 64 GB, which should be enough for now.
Shopping-Liste 🛒
- Raspberry Pi 4. Generation 4 GB RAM
- Raspberry Pi Power supply
- Samsung FIT Plus 64GB 300 MB/s USB 3.1
- Cluster Case
Operating system
For the operating system I chose Ubuntu 20.04 LTS 64 bit, because the official Raspberry Pi operating system Raspbian OS is not yet available in a stable 64 bit version. Even if I only use 4 GB models up to now and could also use 32 bit, I would have to change to a 64 bit operating system at the latest if I buy an 8 GB model in the future. Another point for 64 bit is that the Longhorn software (more about Longhorn in part 2) is only available in a 64 bit version.
Installation
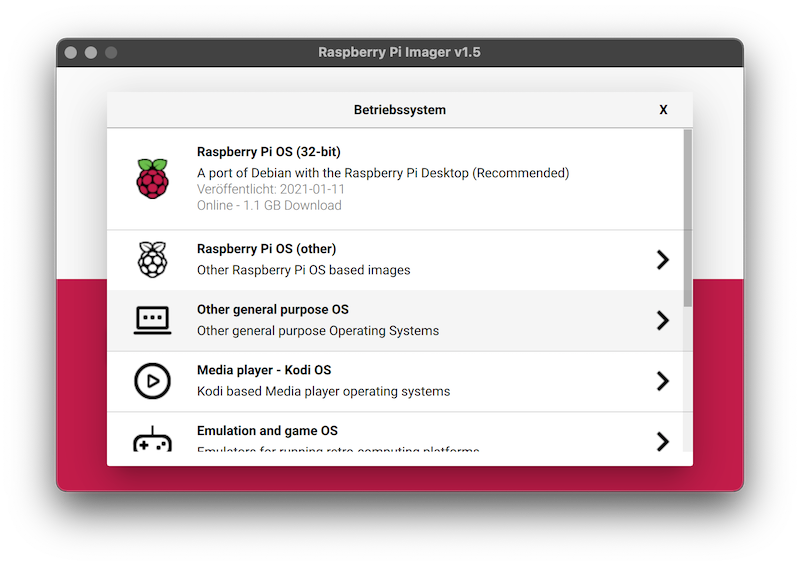
To install the operating system, you can use "Raspberry Pi Imager". The following steps have to be done for each Raspberry Pi:
First select the operating system in Raspberry Pi Imager.

- you can find Ubuntu under the menu item "other general purpose OS".

-
select Ubuntu 20.04 LTS 64 bit.
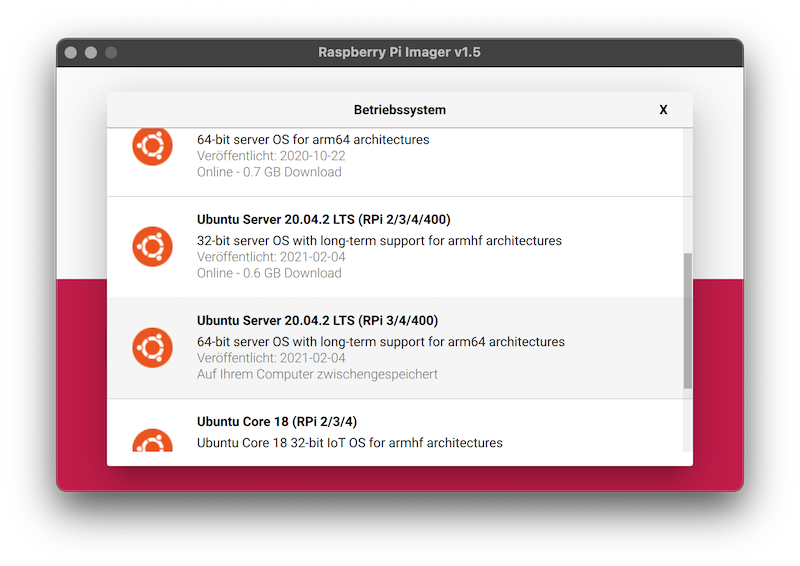
-
then select the USB storage.

-
and click "write" to transfer the operating system to the USB stick.

Once the process is complete, we need to do one last step.
The cluster is operated in headless mode, which means without monitor and keyboard, so it is necessary to activate the SSH service. In order to enable the SSH service, the USB stick has to be unplugged and plugged in again. A drive with the name "system-boot" should appear. Create an empty file with the name ssh on this drive.
This can be done on the Mac with the command touch /Volumes/system-boot/ssh.
At this point, we can plug the stick into the Raspberry Pi and get everything ready for the Kubernetes installation. However in my case Ubuntu didn`t want to boot from the USB stick and after a little research I found this post which explains how to solve the problem: Raspberry Pi 4 Ubuntu 20.04 / 20.10 USB Mass Storage Boot Guide.
Preparation
Before we can start the Kubernetes installation, we need to do some adjustments on each Raspberry Pi. For this, we connect to the Raspberry Pis via SSH and perform the same steps on all of them. The IP addresses of the Raspberry Pis can be determined via the router, where you should also assign a fixed IP address directly.
When connecting via SSH with the user ubuntu you will be asked for a password, which is ubuntu by default. This password has to be changed at the first login. Once this is done, we can get started.
The first thing is to assign a hostname:
hostnamectl set-hostname pi-01This hostname will be displayed later in Kubernetes. I simply numbered my Raspberry Pis in order.
After assigning the hostname, we delete the package manager snap, since we don't need this, and install new updates:
snap list
sudo snap remove lxd && sudo snap remove core18 && sudo snap remove snapd
sudo apt purge snapd -y
sudo apt autoremove -y
sudo apt update -y
sudo apt upgrade -y
After the software is updated, we turn on the container feature from the kernel and allow listening to the bridge traffic in the cluster:
# Enable Container Feature
sudo sed -i '$ s/$/ cgroup_enable=cpuset cgroup_enable=memory cgroup_memory=1 swapaccount=1/' /boot/firmware/cmdline.txt

# Allow listing on bridge traffic
sudo nano /etc/sysctl.d/k3s.conf
# add:
# net.bridge.bridge-nf-call-ip6tables = 1
# net.bridge.bridge-nf-call-iptables = 1
A restart is required to apply the changes.
sudo rebootThe last step is to transfer the SSH key from your computer to the Raspberry Pi so that you can log in without a password in the future and then disable the login via password:
ssh-copy-id -i ~/.ssh/id_rsa.pub ubuntu@<IP>
ssh ubuntu@<IP>
sed -i "s/.*PasswordAuthentication.*/PasswordAuthentication no/g" /etc/ssh/sshd_config
sudo service sshd restart
Once these steps are completed on all Raspberry Pis, Kubernetes can be installed.
K3s
K3s? Didn't we want to install Kubernetes (K8s)? K3s is one of many Kubernetes distributions (Overview) that focuses on Edge, IoT, and ARM. K3s describes itself as "Lightweight Kubernetes" and requires only 500 MB of memory on a server node and 50 MB on an agent node. The name K3s is also intended to show that it is a lightweight Kubernetes:
We wanted an installation of Kubernetes that was half the size in terms of memory footprint. Kubernetes is a 10-letter word stylized as K8s. So something half as big as Kubernetes would be a 5-letter word stylized as K3s. There is no long form of K3s and no official pronunciation.
To install k3s, we use the tool k3sup to perform the installation automatically via SSH. Once k3sup is installed (installation guide), we only need three commands to completely install the cluster:
# Setup K3S Cluster
k3sup install --ip <ip-node-1> \
  --user ubuntu \
  --k3s-extra-args '--disable servicelb,traefik,local-storage' \
  --ssh-key ~/.ssh/<ssk-key-name>
# Join  second server
k3sup join --ip <ip-node-2> \
  --user ubuntu \
  --server --k3s-extra-args '--disable servicelb,traefik,local-storage' \
  --server-ip <ip-node-1> --server-user ubuntu \
  --ssh-key ~/.ssh/<ssk-key-name>
# Join Agent
k3sup join --ip <ip-node-3> \
  --user ubuntu \
  --server-ip <ip-node-1> --server-user ubuntu \
  --ssh-key ~/.ssh/<ssk-key-name>
We install a k3s server on the first node with the first command, which takes over the administration of the cluster. With the parameter --cluster we install the distributed storage system etcd instead of a local SQLite database, which is used to synchronize the cluster state and cluster settings between multiple server nodes (more information about etcd can be found here). This gives us the possibility to install another server node to get a high-availability cluster. If one of the server node crashes, another server node can continue to manage the cluster. I decided to use two nodes in my three node cluster to manage the cluster.
Furthermore we disable the provided loadbalancer service, storage provider and traefik (v1) with the option --k3s-extra-args '--disable servicelb,traefik,local-storage'. This is necessary because we' ll install MetalLB as loadbalancer service, Longhorn as storage provider and version 2 of Traefik later. Without disabling the included services, we will have conflicts within the cluster later on.
The second command adds another server node to the cluster. For this purpose we use the join command and the --server parameter. It is important that you set the --k3s-extra-args '--disable servicelb,traefik,local-storage' option when adding additional server nodes! Otherwise the added server would install the unwanted services.
With the third command we add the last Raspberry Pi as agent nodes, which completes our cluster installation.
K3sup puts the file kubeconfig in the current directory, which contains the certificates and access tokens which are needed for the cluster access. Next we install the CLI tool kubectl to access the cluster: Install and configure kubectl. After the installation we write the path of the kubeconfig file into the environment variable KUBECONFIG (so that kubectl knows where the file is stored), set the context 'default' as active context and display all nodes:
export KUBECONFIG=`pwd`/kubeconfig
kubectl config set-context default
kubectl get node -o wide
Finally, if everything is working as expected, we should be able to see all nodes and our cluster is ready for use.

What comes next
In part 2 of the series we will install MetalLB, Longhorn, Cert-Manager and Traefik v2, which will give us all the basics to run both public and private services/applications in our cluster.