In part one of this series, we installed a k3s Kubernetes cluster, but no application is running on it yet. In this part, we will look at how to add applications to the cluster and what services are needed to run application in public over HTTPs or in private on your own network. Topics like load balancing, TLS certificates and persistent storage will play a role. The goal is to run a public wordpress blog, the DNS service pi.hole and the smart home application Home Assistant in the cluster. As mentioned in the first part, I will not go into the theory of Kubernetes and refer here to the official documentation of Kubernetes: kubernetes.io
Add applications to the cluster
As described in the first part, a Server Node takes care of the administration of the cluster, therefore we have to communicate with a Server Node to do something in the cluster. In order to communicate, a server node provides an API with which we can communicate, e.g. via the CLI tool kubectl.
Kubectl
We already installed and used Kubectl in the first part to show us the nodes in the cluster. We also use kubectl to create new Kubernetes objects, like in this example where a deployment and a service is created:
kubectl create deployment hello-world --image=containous/whoami
kubectl expose deployment/hello-world --port=8080
However, it would be very time-consuming to create the desired setup with individual commands, which is why you describe the desired setup in a YAML file, such as Docker-Compose, and use kubectl to take care of the configuration. The following YAML config creates a deployment and a service, like the example above (note: each Kubernetes object must be described in a separate file, inserting --- allows merging multiple files into one file):
kind: Deployment
apiVersion: apps/v1
metadata:
  name: hello-world
  labels:
    app: hello-world
spec:
  replicas: 1
  selector:
    matchLabels:
      app: hello-world
  template:
    metadata:
      labels:
        app: hello-world
    spec:
      containers:
        - name: hello-world
          image: datenfahrt/aarch64-hello-world
          ports:
            - name: http
              containerPort: 8080
---
apiVersion: v1
kind: Service
metadata:
  name: hello-world
  labels:
    app: hello-world
spec:
  ports:
    - protocol: TCP
      port: 8080
      targetPort: web
  selector:
    app: hello-world
With the following command we apply the YAML config:
kubectl apply -f hello-world.yamlIf you want to specify the Kubernetes objects in separate YAML files for a better overview, it is a good idea to store them in a common folder and number the files in a logical order. A YAML specifying a namespace should start with 1, because the namespace should be created before anything else. The same applies to Secrets, Configmaps or PVC that are accessed by e.g. a deployment. Once you have numbered everything logically, you can pass the complete folder to kubectl
kubectl apply -f hello-world/Helm Chart
If you want to add a new application to the cluster, it is a good idea to research in advance whether there are already YAML examples on the Internet that you can reuse. If you reuse YAML files from other people, you must check each setting to see if it applies to you or if you need to change it.
At this point Helm will come into play. Helm is a package manager for Kubernetes that takes a lot of the work out of installing applications.
With Helm, it is possible for other people to provide so-called Helm Charts that can be used by others to install an application.
Technically, a Helm Chart is made up of several YAML files that act as templates in which variables or conditions are defined. You specify the desired settings in a YAML file (values.yaml), which should be applied to the template. If you install a Helm chart, Helm uses the values.yaml and the templates and generates the actual YAML configurations which are then sent to the Kubernetes cluster. During installation, you can include your own values.yaml file to customize the setup. In this values.yaml only the desired settings have to be defined, because Helm merges the own values.yaml with the standard values.yaml of the Helm chart.
After you installed Helm, you can search for a Helm Chart via artifacthub.io. Once you have found the desired Helm Chart, you have to add the repo of the Helm Chart provider:
helm repo add nicholaswilde https://nicholaswilde.github.io/helm-charts/
helm repo update
Once you have added the repo, you can save the default values.yaml locally:
helm show values nicholaswilde/hedge > values.yamlYou will find all the available settings in the values.yaml file:
image:
  repository: ghcr.io/linuxserver/hedgedoc
  pullPolicy: IfNotPresent
  tag: "1.7.2-ls11"
secret: {}
env:
  TZ: "America/Los_Angeles"
service:
  port:
    port: 3000
ingress:
  enabled: true
  hosts:
    - host: "hedgedoc.192.168.1.203.nip.io"
      paths:
        - path: /
          pathType: Prefix
  tls: []
persistence:
  config:
    enabled: false
    emptyDir: false
    mountPath: /config
    accessMode: ReadWriteOnce
    size: 1Gi
    skipuninstall: false
mariadb:
  enabled: false
  secret: {}
  env: {}
  persistence:
    config:
      enabled: false
      emptyDir: false
      mountPath: /config
      accessMode: ReadWriteOnce
      size: 1Gi
      skipuninstall: false
If you only want to change certain settings and leave the rest at the default, you can leave only these settings in the values.yaml. For example, if you only want to adjust the timezone and disable the setup of an ingress, a values.yaml with the following content is sufficient:
env:
  TZ: "Europe/Berlin"
ingress:
  enabled: false
Once you have made the desired adjustments, you can install the Helm Chart:
helm install hedgedoc nicholaswilde/hedgedoc --values values.mlAs an alternative to the install command, you can also use the upgrade command together with the --install parameter:
helm upgrade --install hedgedoc --values values.yaml nicholaswilde/hedgedocThe advantage of the upgrade command is that you can adjust the value.yaml afterwards and use the same command to make the change to an already installed Helm Chart.
MetalLB as Load-Balancer
If you run Kubernetes in the cloud or a data center, you usually have a software or hardware load balancer that balances the load across all nodes. In a home environment, you typically don't have such a load balancer, which is why we have to go with a different solution.
You might ask why you need a load balancer in this setup at all, since Kubernetes actually takes care of load balancing between the pods, which may be running on different nodes. Besides load balancing, a load balancer also ensures that incoming network requests are only sent to available nodes, which ensures availability. If one of the nodes fails, the remaining nodes can accept the requests. For this purpose, the network requests are not sent directly to one of the node IP addresses, but rather to the IP address of the load balancer.
To obtain such an IP address even without a software or hardware load balancer, we use the service MetalLB, which provides us a virtual IP address. These virtual IP addresses can be used to send network requests to one of the available cluster nodes. To create such a virtual IP address, MetalLB installs a speaker pod on each node. If a ARP-Request for a virtual IP address arrives at the nodes, MetalLB responds to this request with one of the MAC addresses of the cluster nodes. This means that the node which has the returned MAC address will receive network packets for the virtual IP address in the future. As a result, a node receives several IP addresses in the network. If this node fails, MetalLB informs all clients in the network that another node owns the virtual IP (more on this topic here).
We install MetalLB with kubectl using the YAML files from the official GitHub repo:
kubectl apply -f https://raw.githubusercontent.com/metallb/metallb/main/manifests/namespace.yaml

kubectl apply -f https://raw.githubusercontent.com/metallb/metallb/main/manifests/metallb.yaml

kubectl create secret generic -n metallb-system memberlist --from-literal=secretkey="$(openssl rand -base64 128)"
After the installation we have to tell MetalLB the IP address range for which it is responsible. This is done by a ConfigMap which we specify in a YAML file and then apply via kubectl:
apiVersion: v1
kind: ConfigMap
metadata:
  namespace: metallb-system
  name: config
data:
  config: |
    address-pools:
    - name: default
      protocol: layer2
      addresses:
      - 192.168.178.20-192.168.178.39
Note: The DHCP service in the router should not assign an IP address in the same IP address range, otherwise conflicts will occur.
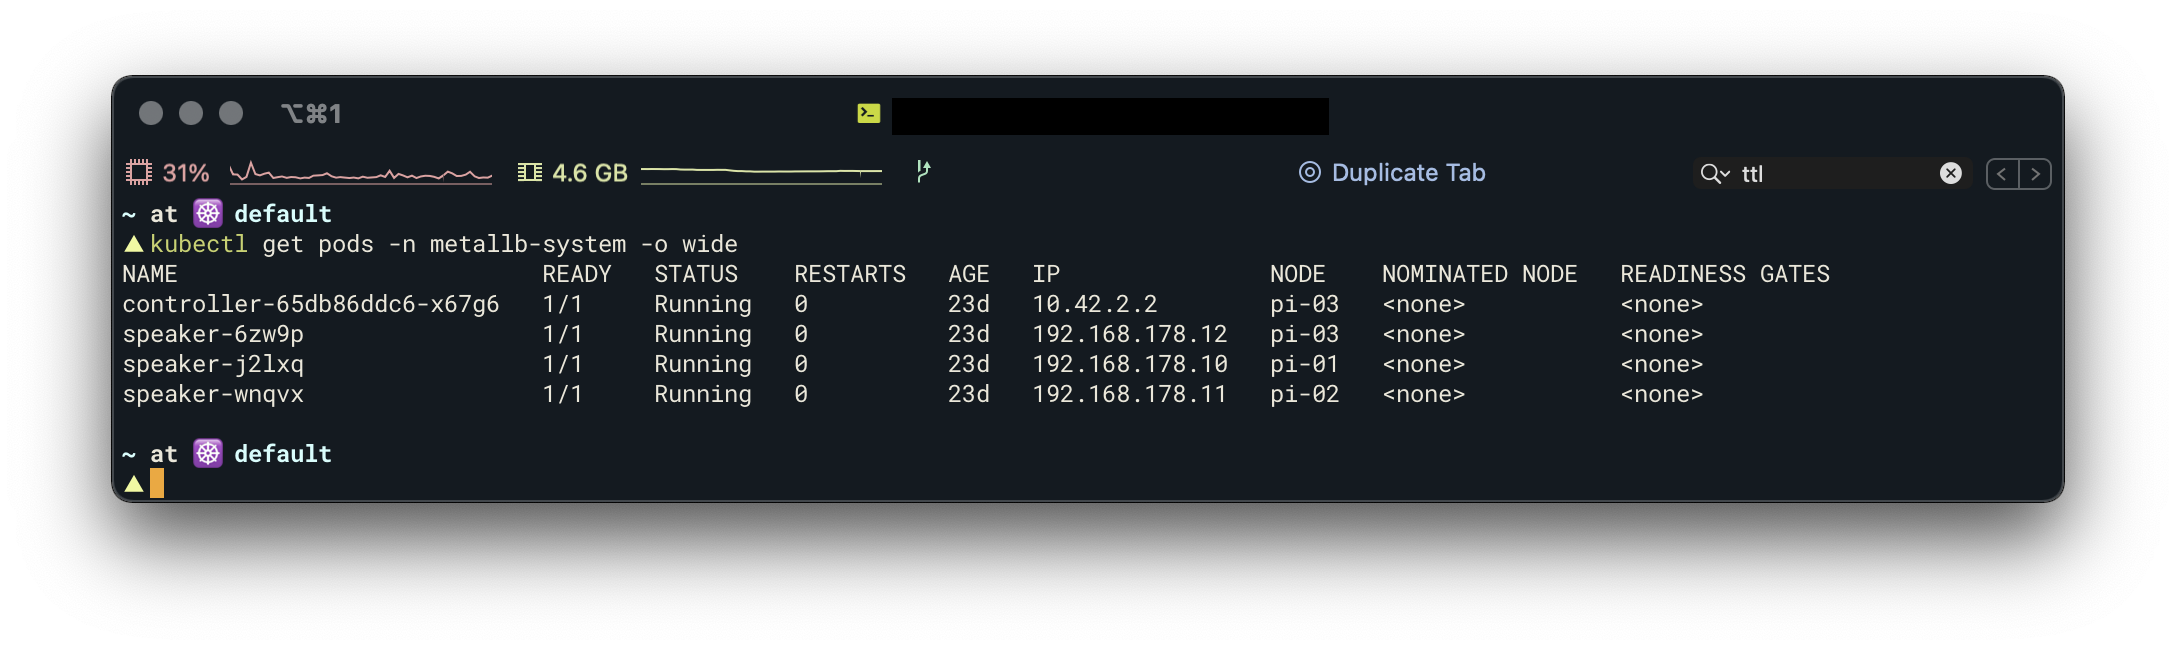
kubectl apply -f address-pool.yamlYou should see one controller pod and one speaker pod per node after installation:
Traefik v2 as Ingress
Traefik is an application proxy that I have been using for a long time in combination with Docker. I really like how easy it is to define routing rules with Traefik and that Traefik takes care of TLS certificates. In my old Docker-Compose setup, I was able to deploy a Docker service to the public via HTTPS by inserting just 5 labels. We use Traefik in our Kubernetes setup as an ingress controller, which routes incoming requests to the appropriate services based on routing rules and also takes care of TLS termination. In addition, we use some of the middlewares provided by Traefik to increase security.
For the installation of Traefik we use the official Helm Chart:
helm repo add traefik https://helm.traefik.io/traefik
helm repo update
Before we install Traefik, we create a YAML file to define some settings:
deployment:
  enabled: true
  kind: DaemonSet

ingressRoute:
  dashboard:
    enabled: false

logs:
  general:
    level: ERROR
  access:
    enabled: true

additionalArguments:
 - "--api.dashboard=true"
 - "--providers.kubernetesingress.ingressclass=traefik-cert-manager"

ports:
  traefik:
    port: 9000
    expose: false
    exposedPort: 9000
    protocol: TCP
  web:
    port: 8000
    expose: true
    exposedPort: 80
    protocol: TCP
  websecure:
    port: 8443
    expose: true
    exposedPort: 443
    protocol: TCP
    tls:
      enabled: true
service:
  enabled: true
  type: LoadBalancer
  externalTrafficPolicy: Local
  externalIPs:
    - 192.168.178.20
Many of the defined settings correspond to the default setting of the Helm Chart. However, I leave them in the YAML file to have a good overview of how my setup looks like.
I install Traefik as a DaemonSet to have a Traefik Pod running on each node. Alternatively, you can install Traefik as a deployment. The pros and cons between both variants can be found here. I disabled the automatic creation of an ingress route for the Traefik dashboard, as I want to define an ingress route myself later. In the additional arguments I defined a name for the ingress class, which is needed for the cert manager later. I use the type "Load-Balancer" for the service, to where I assign the virtual IP 192.168.178.20. Traefik will be reachable via this IP later on.
Once all settings are defined as needed, we can install Traefik via Helm:
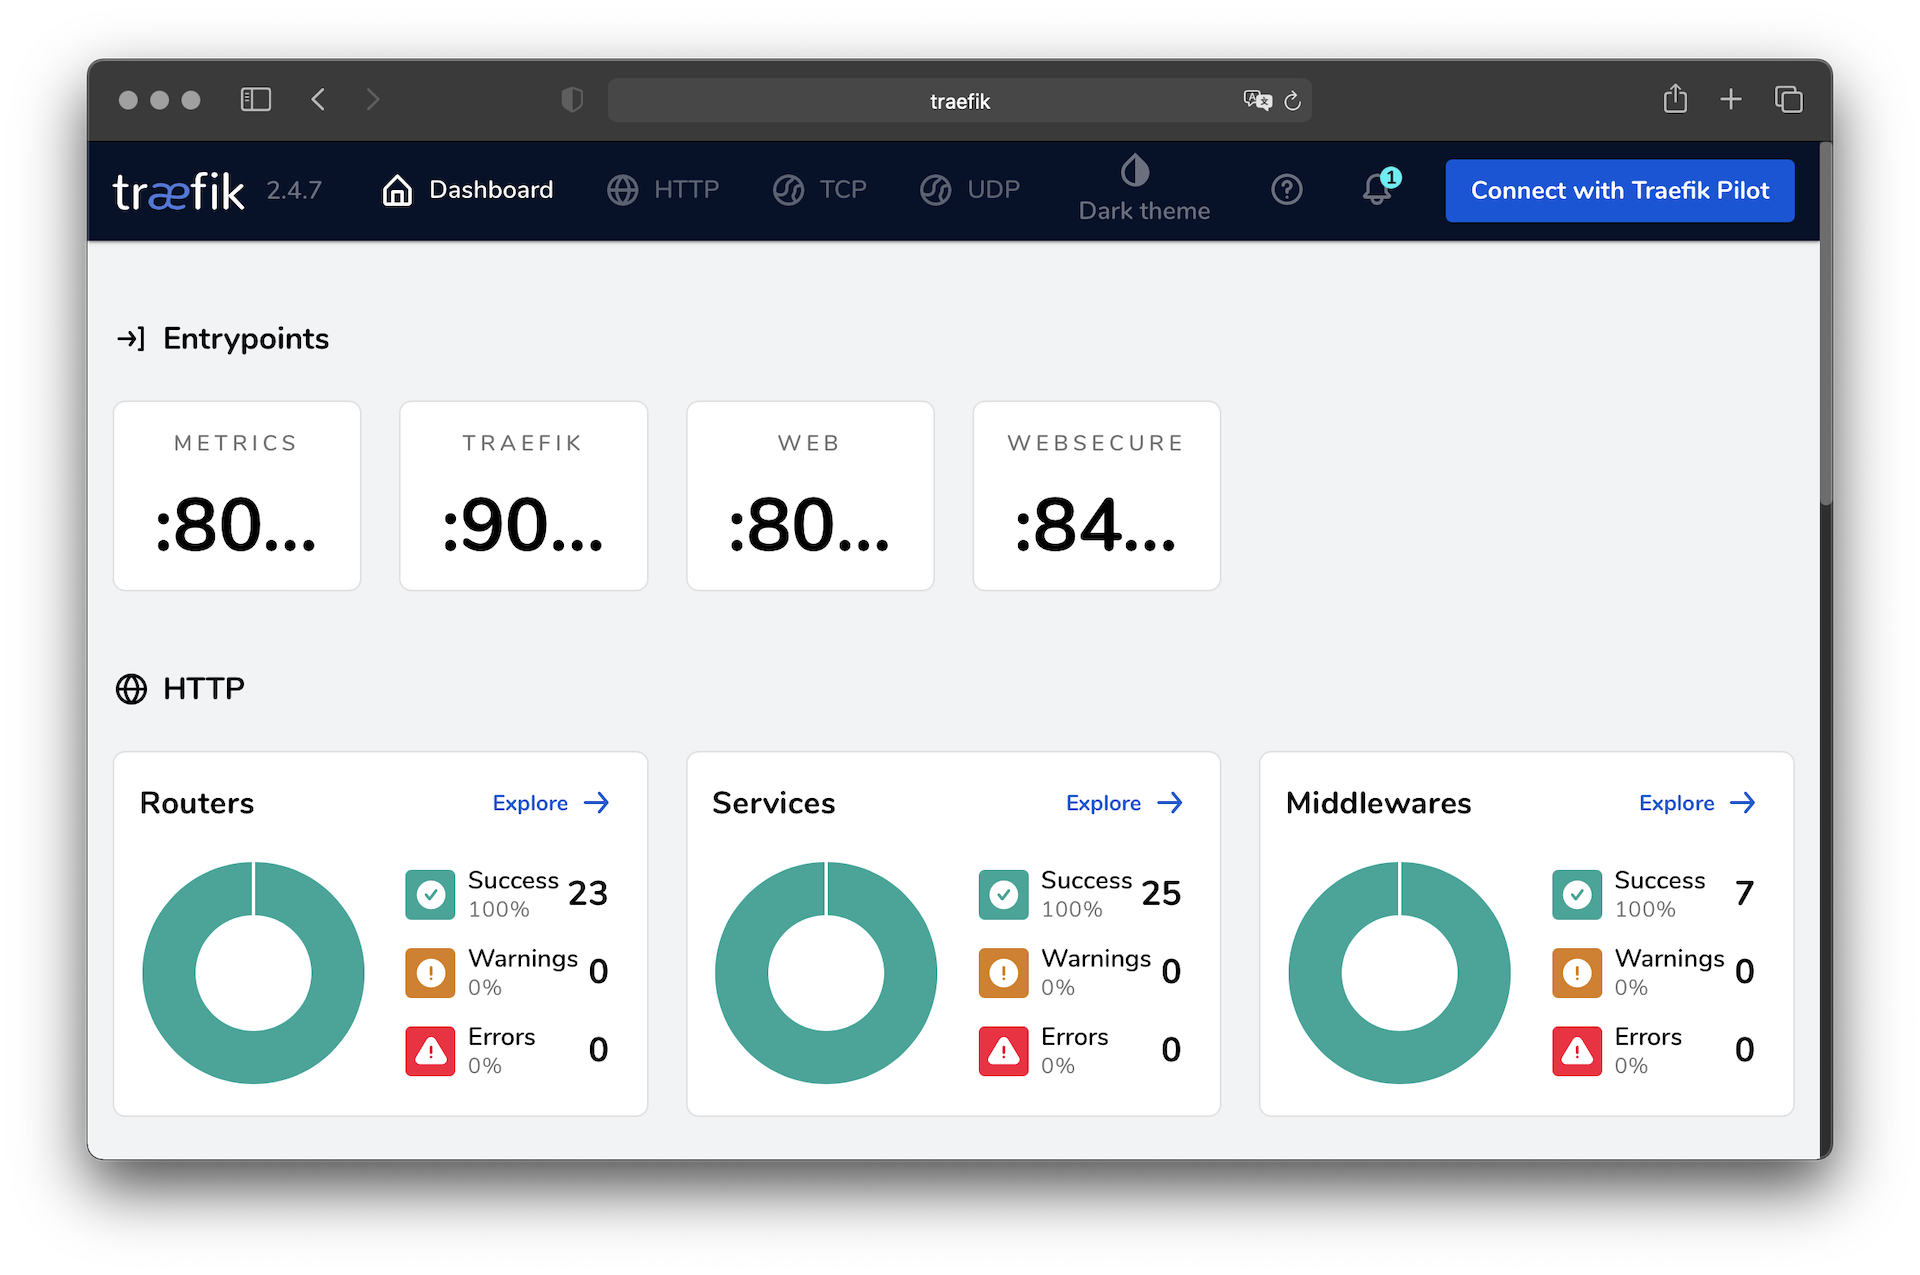
helm upgrade --install --values=config.yaml --namespace kube-system traefik traefik/traefikTo test the setup, you can enter the defined IP address in the browser. A "404 page not found" error message should appear. This error message is totally ok, because no routing rules exist yet. But it shows that the request reaches Traefik.
First Application
After the installation of Traefik and MetalLB, we have all the prerequisites in place to run HTTP applications in the cluster. Since we have not yet tackled the topics of port forwarding, TLS certificates, and persistent storage, we are going to make Traefik's dashboard the first application we make available to us. The dashboard is provided by Traefik and does not need to store any data, so it is very easy to set up.
In order to route HTTP requests to the dashboard, we need an IngressRoute which defines routing rules.
The following YAML file defines a routing rule for the entry point web (http) and the only condition is that the host header in the HTTP request is traefik. Since we make the dashboard available only over our own network, we can choose the hostname as we like. For public applications, we have to enter our own (sub)domain as the hostname. Besides checking the hostname, there are other rules, which can also be combined.
apiVersion: traefik.containo.us/v1alpha1
kind: IngressRoute
metadata:
  name: traefik-dashboard
  namespace: kube-system
spec:
  entryPoints:
    - web
  routes:
  - match: Host(`traefik`)
    kind: Rule
    services:
    - name: api@internal
      kind: TraefikService
The YAML file will be transferred again via kubectl as usual.
To access the dashboard from the local computer, the hostname must be associated with the virtual IP. For this purpose the local host file (Windows: C:\Windows\System32\drivers\etc\hosts and MacOS/Linux: /etc/hosts) has to be used. Enter the virtual IP followed by the defined host name in this file.
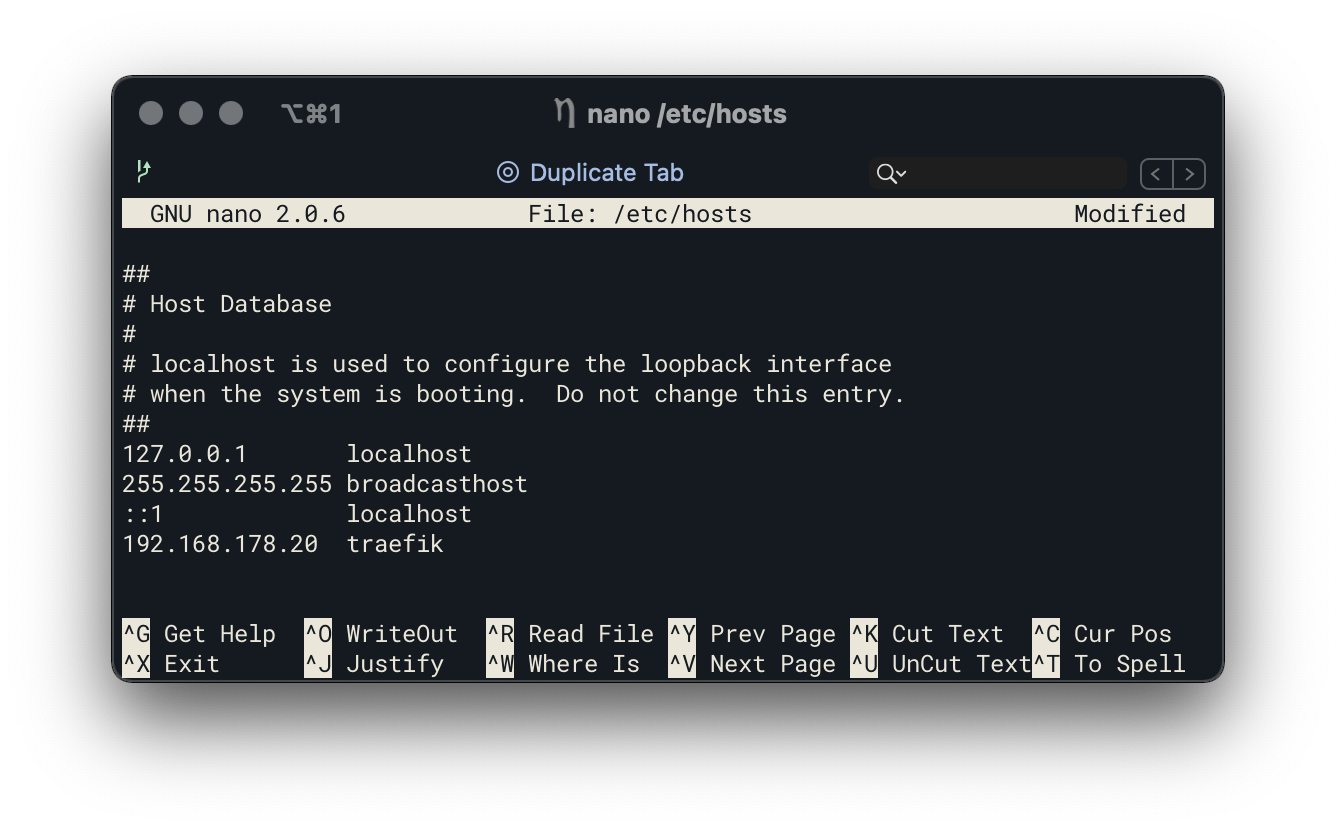
If you now type http://traefik into the browser, the dashboard of Traefik will appear.
Basic Auth Middleware
Traefik's dashboard comes without password protection and can be accessed by anyone on the network. Even if no changes can be made via the dashboard, a password protection is not a bad idea.
To protect the dashboard with a password, we will use the Basic-Auth Middleware from Traefik. This middleware expects the Basic-Auth credentials as a secret:
# https://docs.traefik.io/middlewares/basicauth/#users
# Note: in a kubernetes secret the string (e.g. generated by htpasswd) must be base64-encoded first.
# To create an encoded user:password pair, the following command can be used:
# htpasswd -nb user password | openssl base64
apiVersion: v1
kind: Secret
metadata:
  name: traefik-basic-auth
  namespace: kube-system
data:
  users: dXNlcjokYXByMSRtVy5UTjR3ZyRCTW1nZExSZ0FJNkNQWmtXb09oOUkvCgo=
After the secret is added via kubectl, we can define the middleware and add the middleware to the cluster via kubectl:
apiVersion: traefik.containo.us/v1alpha1
kind: Middleware
metadata:
  name: basic-auth
  namespace: kube-system
spec:
  basicAuth:
    secret: traefik-basic-auth
As a final step, we need to include the middleware in the IngressRoute which we have created earlier:
apiVersion: traefik.containo.us/v1alpha1
kind: IngressRoute
metadata:
  name: traefik-dashboard
  namespace: kube-system
spec:
  entryPoints:
    - web
  routes:
  - match: Host(`traefik`)
    kind: Rule
    services:
    - name: api@internal
      kind: TraefikService
    middlewares:
    - name: traefik-basic-auth
Once the changes are applied, a username + password prompt should appear when opening the dashboard.
IPWhiteList Middleware
In the next step, we will expose our cluster to the Internet, which will also allow third parties to reach the cluster. As I run applications in the cluster which should not be accessed via the Internet, I use the IPWhiteList Middleware to restrict access to certain IPs:
apiVersion: traefik.containo.us/v1alpha1
kind: Middleware
metadata:
  namespace: kube-system
  name: private-ips
spec:
  ipWhiteList:
    sourceRange:
      - 127.0.0.1/32
      - 192.168.178.0/24
      - 10.42.0.0/16
This middleware will block all network requests from IP addresses that are not defined in the list. The third IP range (10.42.0.0/16) in the list, is Kubernetes itself and I have added this range to allow other applications in the cluster (e.g. Heimdall) to access the dashboard.
Once the middleware has been created, it can be added to the IngressRoute in the same way as the Basic-Auth middleware:
apiVersion: traefik.containo.us/v1alpha1
kind: IngressRoute
metadata:
  name: traefik-dashboard
  namespace: kube-system
spec:
  entryPoints:
    - web
  routes:
  - match: Host(`traefik`)
    kind: Rule
    services:
    - name: api@internal
      kind: TraefikService
    middlewares:
    - name: private-ips
    - name: traefik-basic-auth
Cert-Manager
It is recommended to use an HTTPS connection for public applications, which works without much effort or high costs thanks to Let's Encrypt.
Until now, I have used Traefik to generate and manage the Let's Encrypt TLS certificates. This works totally fine in my old Docker Compose setup. The challenge in a cluster setup is to store the generated certificates in a way that they are available for all nodes. In the beginning, I planned to use a distributed block storage to store the certificates. But the block storage runs in read-write-once mode, which means only one pod can get read and write access. In my case, Traefik runs in DaemonSet mode, which means I have more than one pod. After a quick research, I came across Cert-Manager, which also generates and manages certificates via Let's Encrypt. Unlike Traefik, Cert-Manager stores the certificates as Secret, which allows all pods to read the certificates.
The installation of the Cert-Manager will be done via the official Helm Chart:
kubectl create namespace cert-manager
helm repo add jetstack https://charts.jetstack.io
helm repo update

helm install cert-manager jetstack/cert-manager --namespace cert-manager --version v1.2.0 --create-namespace --set installCRDs=true
Once the installation is done, you need to create a ClusterIssuer where you define an email address for Let's Encrypt and an ingress class. The name of the ingress class was already defined during the installation of Traefik (additionalArguments option).
apiVersion: cert-manager.io/v1alpha2
kind: ClusterIssuer
metadata:
  name: letsencrypt-prod
spec:
  acme:
    # You must replace this email address with your own.
    # Let's Encrypt will use this to contact you about expiring
    # certificates, and issues related to your account.
    email:
    server: https://acme-v02.api.letsencrypt.org/directory
    privateKeySecretRef:
      # Secret resource used to store the account's private key.
      name: letsencrypt-prod
    solvers:
      - http01:
          ingress:
            class: traefik-cert-manager
Due to the rate limiting of Let's Encrypt it is recommended to define an additional ClusterIssuer which is used until the setup works correctly. This ClusterIssue will use the stagging environment of Let's Encrypt, which is not limited in the number of requests.
apiVersion: cert-manager.io/v1alpha2
kind: ClusterIssuer
metadata:
  name: letsencrypt-staging
spec:
  acme:
    # You must replace this email address with your own.
    # Let's Encrypt will use this to contact you about expiring
    # certificates, and issues related to your account.
    email:
    server: https://acme-staging-v02.api.letsencrypt.org/directory
    privateKeySecretRef:
      # Secret resource used to store the account's private key.
      name: letsencrypt-staging
    solvers:
      - http01:
          ingress:
            class: traefik-cert-manager
First public application via HTTPS
The cluster is prepared to run public applications via HTTPS, however the setup of port forwarding on the router and a (Dyn)DNS address is still missing. I will not go into the details of both of these, as the setup differs depending on the router or DNS provider. The important thing is that at the end you forward the incoming traffic to the cluster via port 80 and 443. As target IP you use the virtual load balancer IP from Traefik. Even if you don't plan to run applications over HTTP, you still have to enable port 80 for generating TLS certificates. Unlike Traefik, Cert Manager only offers the possibility to generate the certificate via an HTTP-Challenge instead of a TLS-Challenge.
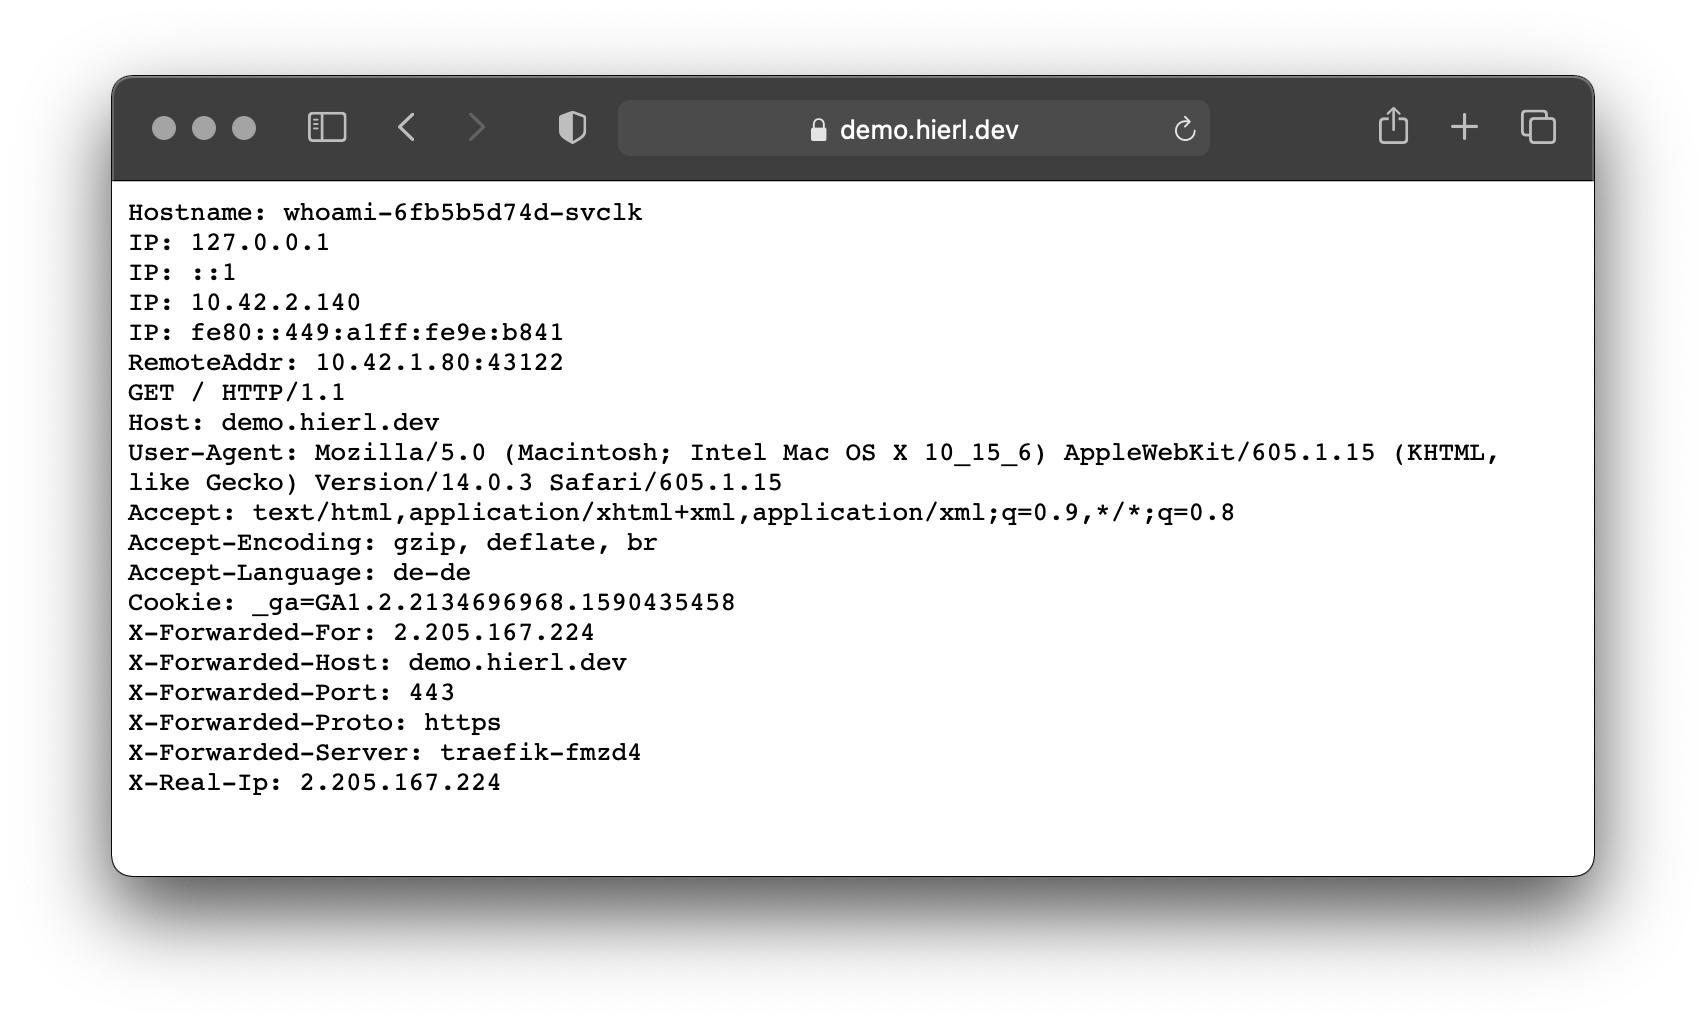
Once the cluster is accessible from the internet via port 80 and 443, the first public application can be installed. We will use whoami from Traefik as our first application. Whoami is a small web server that returns HTTP information.
First of all we define a Certificate object which triggers the generation of a TLS certificate via Cert-Manager. Once the certificate has been generated, it is stored as a secret with the name secure-whoami-cert. If you use the Cert-Manager for the first time to generate a certificate, you should first use the ClusterIssuer for the staging environment (letsencrypt-staging) instead of directly using the Prod environment (letsencrypt-prod) of Let's Encrypt.
Certificate
apiVersion: cert-manager.io/v1alpha2
kind: Certificate
metadata:
  name: secure-whoami-cert
spec:
  commonName: demo.hierl.dev
  secretName: secure-whoami-cert
  dnsNames:
    - demo.hierl.dev
  issuerRef:
    name: letsencrypt-prod
    kind: ClusterIssuer
The next step is to generate the deployment and the corresponding service
Deployment
apiVersion: apps/v1
kind: Deployment
metadata:
  name: whoami
spec:
  replicas: 1
  selector:
    matchLabels:
      app: whoami
  template:
    metadata:
      labels:
        app: whoami
    spec:
      containers:
      - image: containous/whoami
        name: whoami-container
        ports:
        - containerPort: 80
          name: web
Service
apiVersion: v1
kind: Service
metadata:
  name: whoami
  labels:
    app: whoami
spec:
  ports:
    - protocol: TCP
      name: web
      port: 8080
      targetPort: web
  selector:
    app: whoami
As a last step we define an IngressRoute to make Whoami available via Traefik to the public. It is important that the domain in the routing rule is the same as in the Certificate object and that the secret name for TLS is the defined secret name from the Certificate object, since the TLS certificate is stored under this name.
IngressRoute
apiVersion: traefik.containo.us/v1alpha1
kind: IngressRoute
metadata:
  name: whoami-https
  labels:
    app: whoami
spec:
  entryPoints:
    - websecure
  routes:
    - match: Host(`demo.hierl.dev`)
      kind: Rule
      services:
        - name: whoami
          port: 8080
  tls:
    secretName: secure-whoami-cert
Once you have applied everything the YAML via kubectl, Whoami can be reached via an HTTPS connection.
http to https redirect
If you access the domain via HTTP instead of HTTPS, you will get a 404 error. The reason for this is that the defined ingress route is only valid for the Web Secure Endpoint (port 443). Traefik offers the option to redirect all requests on the web endpoint (port 80) to the web secure endpoint. Unfortunately, I can't run internal applications over HTTPS without a lot of effort and need to use HTTP here, so I can't use this option. Instead of defining this redirection in a central place, it is possible to use a middleware per IngressRoute to define if a redirection to HTTPS should be applied. This middleware is applied to an IngressRoute for the web endpoint:
Middleware
apiVersion: traefik.containo.us/v1alpha1
kind: Middleware
metadata:
  name: https-only
  namespace: kube-system
spec:
  redirectScheme:
    scheme: https
Web Endpoint IngressRoute
apiVersion: traefik.containo.us/v1alpha1
kind: IngressRoute
metadata:
  name: whoami-http
  labels:
    app: whoami

spec:
  entryPoints:
    - web
  routes:
    - match: Host(`demo.hierl.dev`)
      kind: Rule
      services:
        - name: whoami
          port: 8080
      middlewares:
      - name: https-only
        namespace: kube-system
Security-Headers
Another interesting middleware is the header middleware, which allows to set security header for the response:
Middleware
apiVersion: traefik.containo.us/v1alpha1
kind: Middleware
metadata:
  namespace: kube-system
  name: security-header
spec:
  headers:
    frameDeny: true
    sslRedirect: true
    browserXssFilter: true
    contentTypeNosniff: true
    stsIncludeSubdomains: true
    stsPreload: true
    stsSeconds: 31536000
IngressRoute
apiVersion: traefik.containo.us/v1alpha1
kind: IngressRoute
metadata:
  name: whoami-https
  labels:
    app: whoami
spec:
  entryPoints:
    - websecure
  routes:
    - match: Host(`demo.hierl.dev`)
      kind: Rule
      services:
        - name: whoami
          port: 8080
      middlewares:
      - name: security-header
        namespace: kube-system
  tls:
    secretName: secure-whoami-cert
Longhorn as distributed block storage
In a cluster setup, you have the challenge of storing data persistently, because unlike a single-node setup, you can't just define a local path on the node where you want to store the data. Kubernetes controls which pod runs on which node and if Kubernetes moves a pod to another node because the original node is no longer available or for better load balancing, the data does not move to the new node and the pod can no longer access the data.
Longhorn provides a solution for this problem. Longhorn is a distributed block storage, which takes over the storage management in the cluster. The data is replicated on several nodes and the pods access the data indirectly via Longhorn. For the pod, it does not matter on which nodes the physical data is stored. If a node fails, the data is still available due to replication and pods that are booted on the still available nodes can still access the data. When the failed node becomes available again, Longhorn takes care of syncing the data between all replicas to get back in sync. Longhorn supported only the Read-Write-Once mode until version 1.1, where only one pod is allowed to access the data. If multiple pods want to access the same defined storage volume, an error occurs. Since version 1.1, Longhorn offers a Read-Write-Many mode. However, this mode is a bit more complicated, so we'll continue with the Read-Write-Once mode for now.
Longhorn is easy to install via the official YAML file:
kubectl create namespace longhorn-system
kubectl apply -f https://raw.githubusercontent.com/longhorn/longhorn/master/deploy/longhorn.yaml
Once Longhorn is installed, you can use a persistent volume claim (PVC) object to define a volume for a pod. In this example, we create a PVC named data-pvc to which we assign the storage class "Longhorn" and 20 GB of memory:
apiVersion: v1
kind: PersistentVolumeClaim
metadata:
  name: data-pvc
spec:
  accessModes:
    - ReadWriteOnce
  storageClassName: longhorn
  resources:
    requests:
      storage: 20Gi
Longhorn creates a replica, which creates a volume on three nodes. In a deployment we can now reference this PVC and Longhorn takes care of storing and replicating the data.
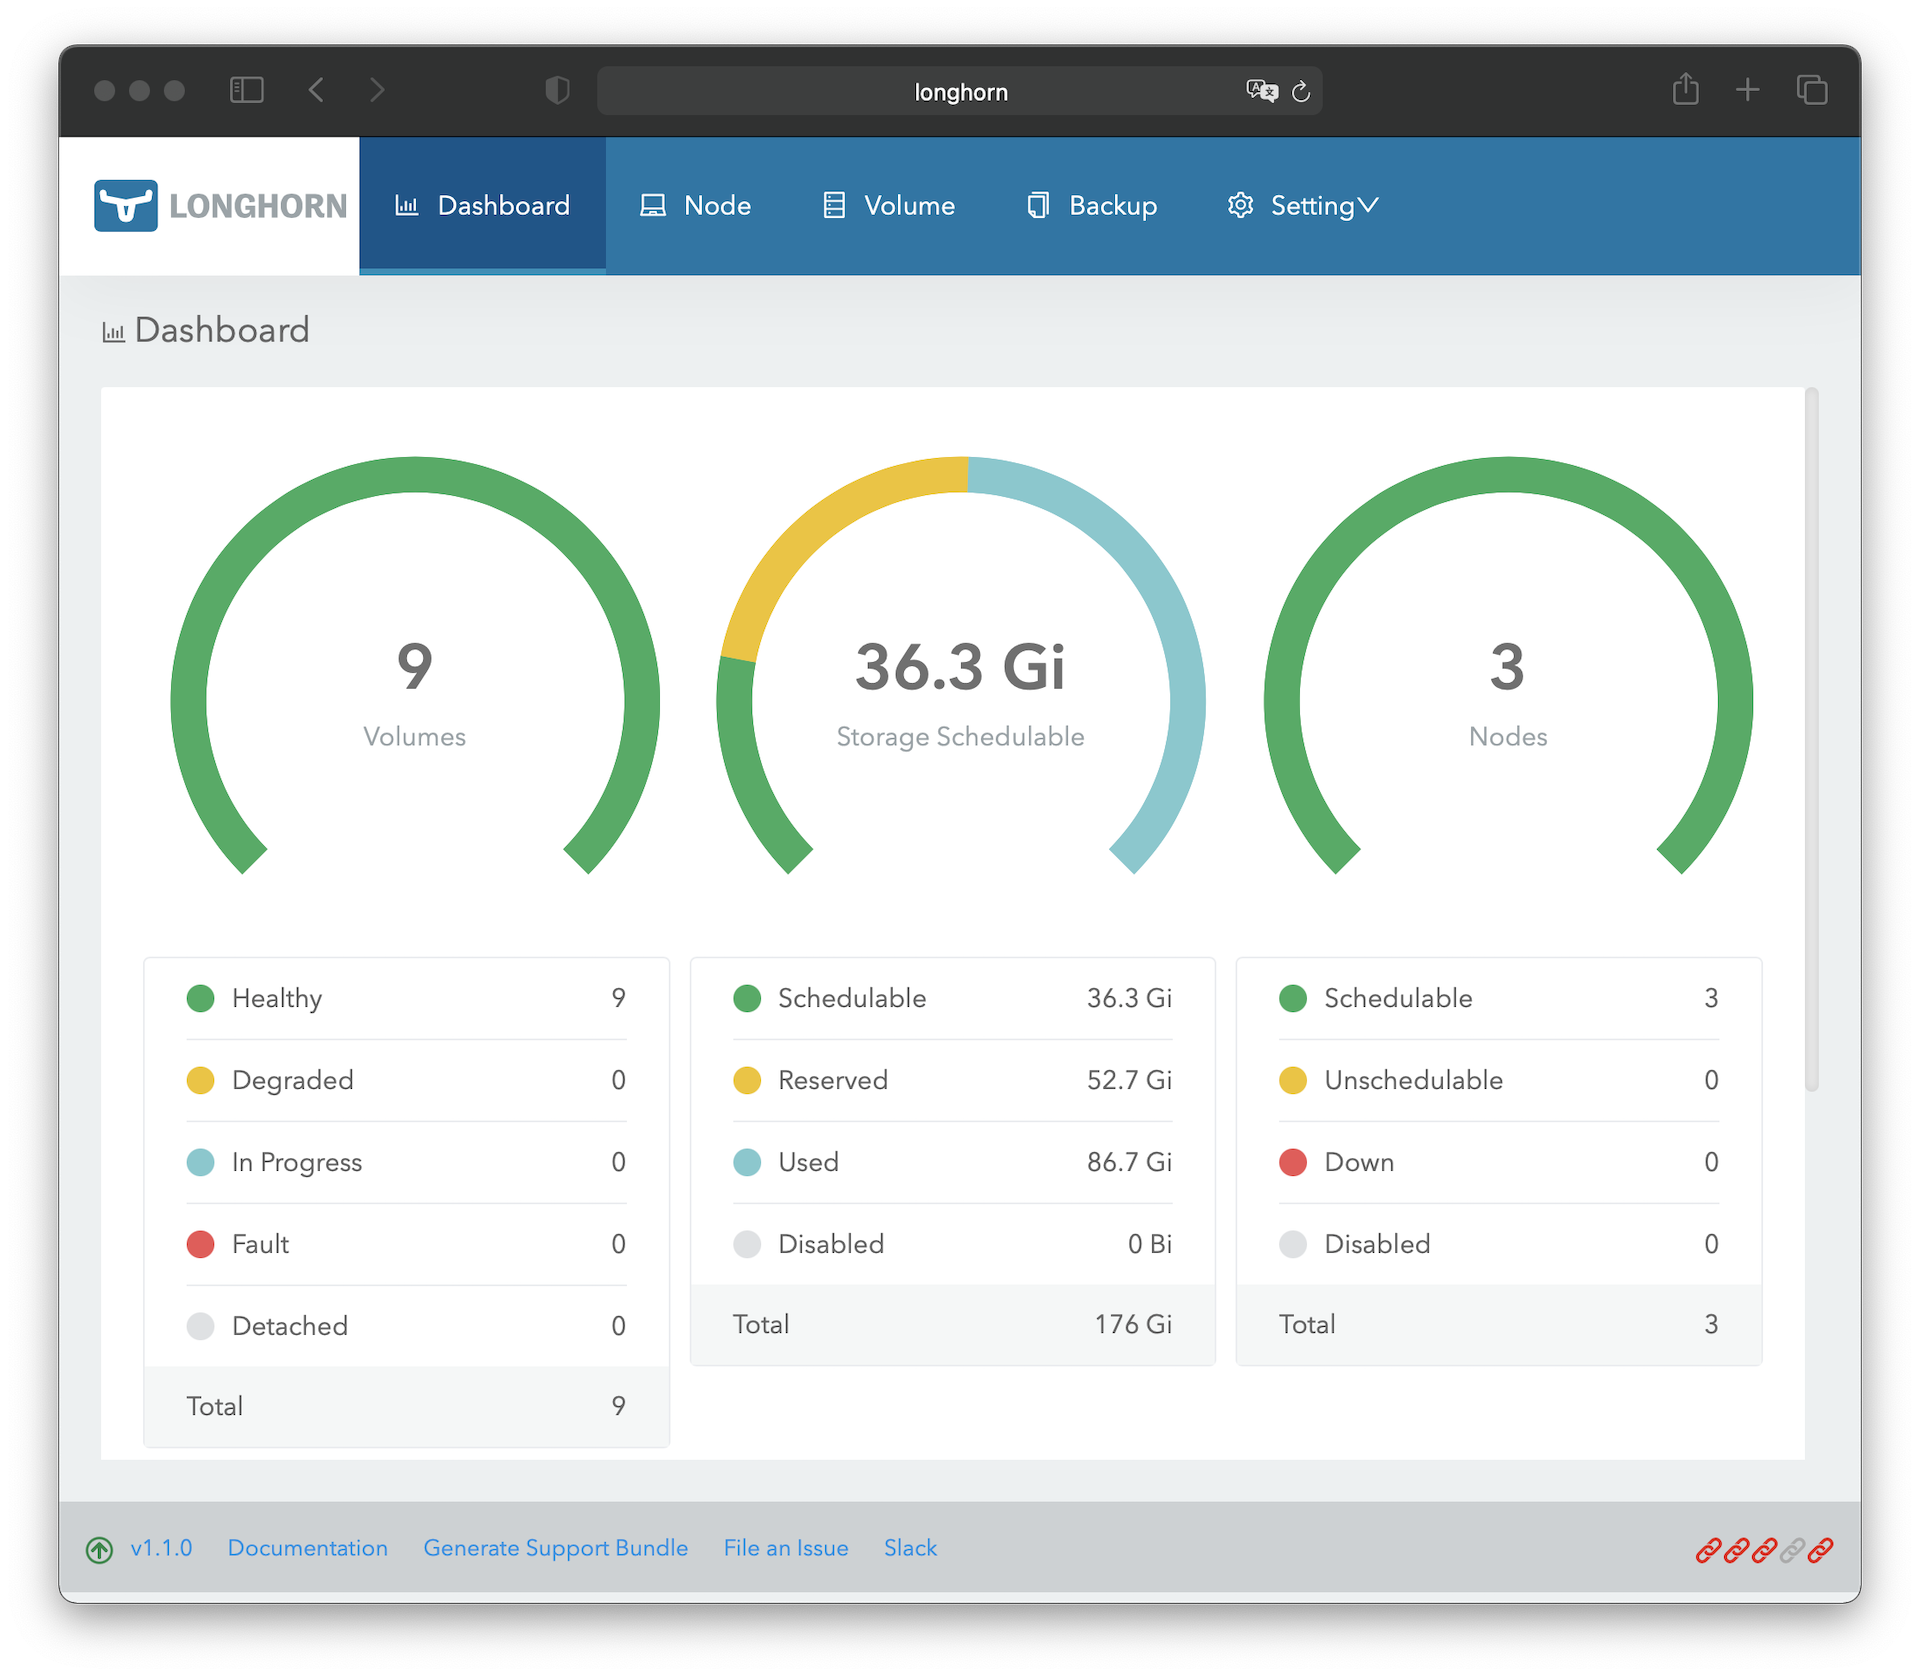
Longhorn provides a web frontend, which can be used to manage Longhorn. In addition to adjusting settings and managing volumes, it is also possible to create snapshots or backups, or to set up a job for the automatic creation of snapshots and/or backups.
In order to be able to access the web frontend, we still have to create an IngressRoute. Since the web frontend of Longhorn does not have any protection, we have to use the Basic-Auth middleware again in the IngressRoute and additionally limit the access to internal IP addresses:
apiVersion: traefik.containo.us/v1alpha1
kind: IngressRoute
metadata:
  name: longhorn-frontend
  namespace: longhorn-system
spec:
  entryPoints:
    - web
  routes:
    - match: Host(`longhorn`)
      kind: Rule
      services:
        - name: longhorn-frontend
          port: 80
      middlewares:
      - name: private-ips
        namespace: kube-system
      - name: traefik-basic-auth
        namespace: kube-system
In order to be able to access the Longhorn web frontend from your own computer, you need to add the hostname and IP address to the local hosts file, as we did with Traefik. Since we will also install a DNS server in the next step, you can skip this step for now.
Pi.Hole
Pi-hole is an ad blocker that operates at the network level and blocks DNS requests to ad networks etc.. This has the advantage that advertising is blocked for all devices in the network and no software needs to be installed on the devices. In addition to advertising, tracking, phishing, SPAM or malware sites can also be blocked. Pi-hole takes the role of a DNS server in the network and processes all DNS requests from the network. If a device queries a domain that is on a block list, the query is answered with an invalid IP, preventing communication with this domain. All allowed DNS queries are forwarded to a public DNS server, which then returns the IP to the domain. In addition to blocking DNS Requests, Pi-hole can also be used to set custom DNS records to make applications in the cluster accessible to the entire network. It is then no longer necessary to adjust the local host file on the own device.
The setup of Pi-hole is a bit more complex than the previous setups, but only well-known components are used.
Persistent-Volume-Claim
Pi-Hole needs two persistent storages for DNS cache and settings:
apiVersion: v1
kind: PersistentVolumeClaim
metadata:
  name: pihole-pvc-data
spec:
  accessModes:
    - ReadWriteOnce
  storageClassName: longhorn
  resources:
    requests:
      storage: 1Gi
---
apiVersion: v1
kind: PersistentVolumeClaim
metadata:
  name: pihole-pvc-dnsmasq
spec:
  accessModes:
    - ReadWriteOnce
  storageClassName: longhorn
  resources:
    requests:
      storage: 1Gi
Secret
The web interface of Pi-Hole is protected by a password, which will be defined in a secret:
apiVersion: v1
kind: Secret
metadata:
  name: pihole-secret
type: Opaque
stringData:
  password:
Deployment
We specify in the deployment definition that only 1 pod of Pi-Hole should exist (replicas = 1 and strategy = Recreate), since our storage runs in ReadWriteOnce mode and multiple instances of PiHole would cause a conflict. Port 80 must be released for the web interface and port 53 is required for the DNS queries. Since the DNS protocol uses TCP and UDP, we have to define a port mapping for both protocols. We use the environment variables to tell Pi-hole which IP is used to reach the service, which DNS name we want to use to call the web interface, which timezone should be used and which secret name is used for the web interface password.
The last step to do is to define the mount points and link them to the persistent volume claims and add the "NET_ADMIN" role to the permissions:
apiVersion: apps/v1
kind: Deployment
metadata:
  name: pihole-deployment
  labels:
    app: pihole
spec:
  replicas: 1
  strategy:
    type: Recreate
  selector:
    matchLabels:
      app: pihole
  template:
    metadata:
      labels:
        app: pihole
    spec:
      containers:
      - name: pihole
        image: pihole/pihole:latest
        imagePullPolicy: Always
        ports:
        - name: pi-admin
          containerPort: 80
          protocol: TCP
        - containerPort: 53
          name: dns-tcp
          protocol: TCP
        - containerPort: 53
          name: dns-udp
          protocol: UDP
        env:
        - name: ServerIP
          value: "192.168.178.20"
        - name: VIRTUAL_HOST
          value: pi.hole
        - name: TZ
          value: 'Europe/Berlin'
        - name: WEBPASSWORD
          valueFrom:
            secretKeyRef:
              name: pihole-secret
              key: password
        volumeMounts:
        - name: pihole-data
          mountPath: /etc/pihole
        - name: pihole-dnsmasq
          mountPath: /etc/dnsmasq.d
        securityContext:
          capabilities:
            add:
              - NET_ADMIN
      volumes:
      - name: pihole-data
        persistentVolumeClaim:
          claimName: pihole-pvc-data
      - name: pihole-dnsmasq
        persistentVolumeClaim:
          claimName: pihole-pvc-dnsmasq
Services
We need three services for the setup. The first service is for the web interface, which we make accessible via an Ingress route. For the DNS service we create a service of type "LoadBalancer" to get a virtual IP like Traefik. Unfortunately, Kubernetes does not allow us to use the TCP and UDP protocols in one service, so we need to define a separate service for both. To allow both services to use the same IP, we need to tell MetalLB via an annotation that defined IP may be shared.
apiVersion: v1
kind: Service
metadata:
  name: pihole-admin-service
spec:
  type: ClusterIP
  selector:
    app: pihole
  ports:
    - protocol: TCP
      name: pihole-admin
      port: 80
      targetPort: pi-admin
---
apiVersion: v1
kind: Service
metadata:
  name: pihole-service-udp
  annotations:
    metallb.universe.tf/allow-shared-ip: pihole-svc
spec:
  type: LoadBalancer
  selector:
    app: pihole
  ports:
    - protocol: UDP
      name: dns-udp
      port: 53
      targetPort: dns-udp
  loadBalancerIP: 192.168.178.21
  externalTrafficPolicy: Local
---
apiVersion: v1
kind: Service
metadata:
  name: pihole-service-tcp
  annotations:
    metallb.universe.tf/allow-shared-ip: pihole-svc
spec:
  type: LoadBalancer
  selector:
    app: pihole
  ports:
    - protocol: TCP
      name: dns-tcp
      port: 53
      targetPort: dns-tcp
  loadBalancerIP: 192.168.178.21
  externalTrafficPolicy: Local
IngressRoute
The IngressRoute for the web interface uses the web endpoint (HTTP / port 80) and uses the private-ips middleware so that it can only be accessed from the internal network.
apiVersion: traefik.containo.us/v1alpha1
kind: IngressRoute
metadata:
  name: pihole-ingress-route
spec:
  entryPoints:
    - web
  routes:
    - match: Host(`pi.hole`)
      kind: Rule
      services:
        - name: pihole-admin-service
          port: 80
      middlewares:
        - name: private-ips
          namespace: kube-system
If all configurations have been applied via kubectl, we can add the defined IP address on the local computer as DNS server. You can then open the web interface via http://pi.hole. Once you have logged in to the web interface, you can set the upstream DNS server of your choice and the 'Conditional forwarding' settings in the "Settings > DNS" section. Then you can define your own DNS records in the "Local DNS > DNS Records" section:
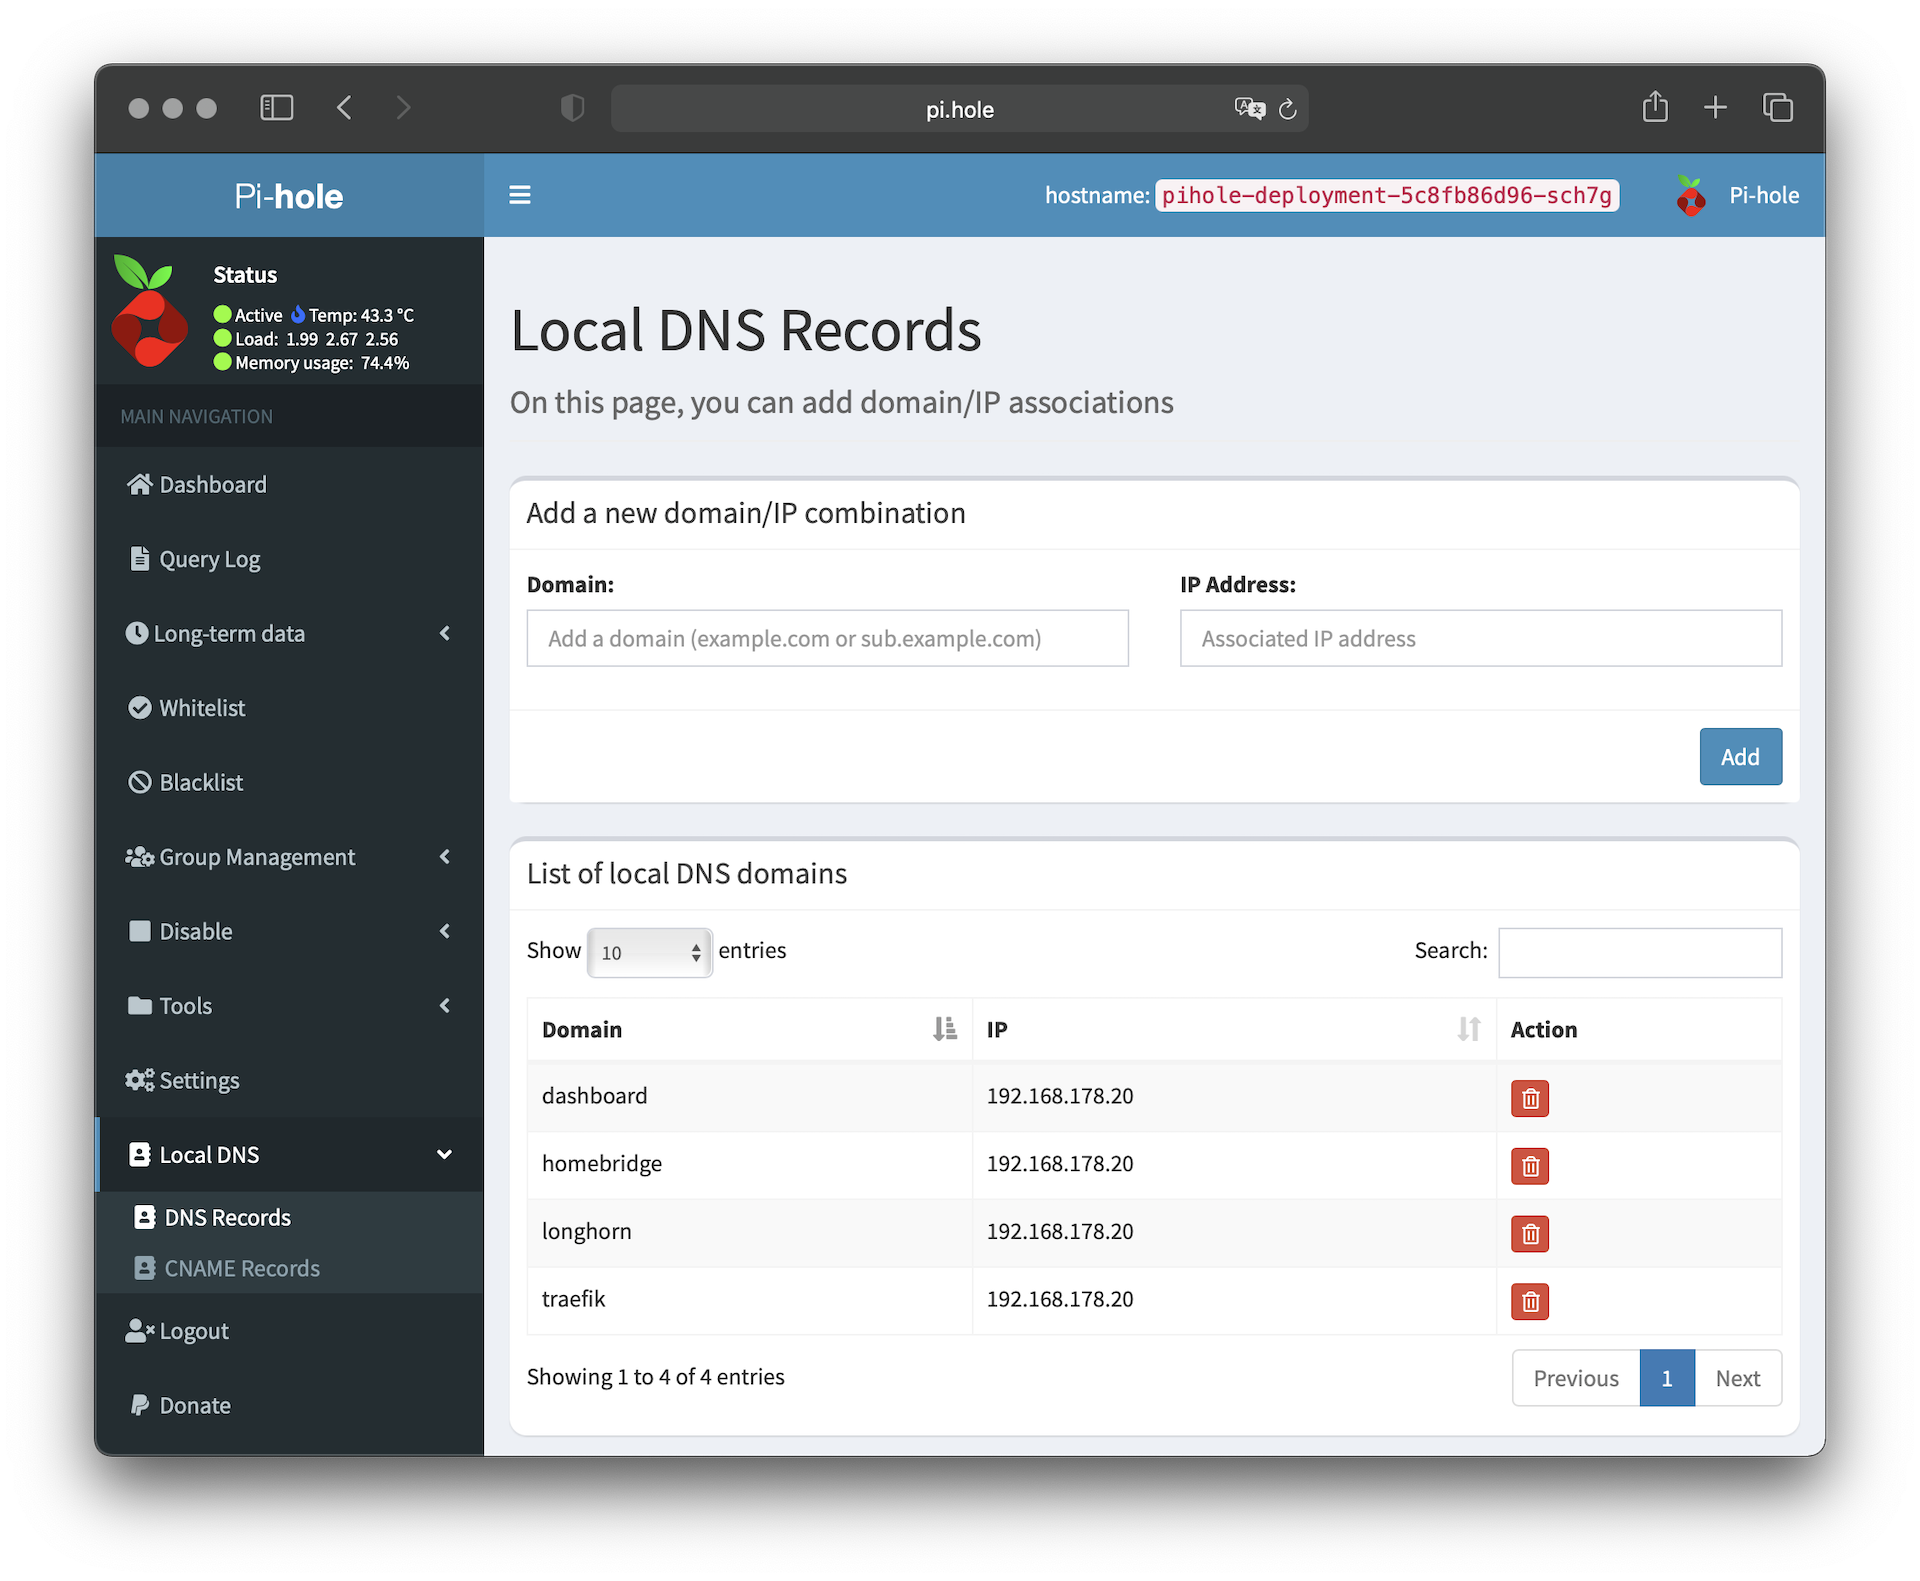
Once the local DNS entries are defined, you can delete the entries from the local host file. In the "Group Management > Adlists" section, you can add public filter lists that are used for blocking advertising, tracking, and so on. A collection of filter lists can be found at firebog.net.
If you have set up Pi-hole according to your own wishes and the setup works without problems on the local computer, you can configure the router so that all devices in the network use the IP address of Pi-hole as DNS server. It is recommended not to set the upstream DNS of the router to the IP of Pi-hole, instead you should enter the DNS server in the DHCP settings. This way all devices communicate directly with Pi-hole and not first with the router, which then communicates with Pi-hole.
Home Assistant
Home Assistant is an open source home automation solution which you can host yourself and offers many automation possibilities. The installation can be done via a Helm Chart.
Persistent-Volume-Claim
Before installing the Helm Chart, I create a persistent volume claim to store the data and the SQLite database. The persistent volume claim can also be created directly with the Helm Chart, but if I ever had to delete Home Assistant, the persistent volume claim would be deleted as well. To prevent this, I create the persistent volume claim myself and refer to the existing persistent volume claim in the Helm Chart.
apiVersion: v1
kind: PersistentVolumeClaim
metadata:
  name: homeassistant-pvc-data
spec:
  accessModes:
    - ReadWriteOnce
  storageClassName: longhorn
  resources:
    requests:
      storage: 1Gi
Helm Chart
To customize the installation, we will need a YAML file. Within this we define the timezone, disable the creation of an IngressRoute, refer to our persistent volume claim and define our DNS servers:
image:
  repository: homeassistant/home-assistant
  pullPolicy: IfNotPresent
  tag: latest
env:
  TZ: Europe/Berlin

controllerType: statefulset

strategy:
  type: RollingUpdate

resources:
  limits:
    cpu: 500m
    memory: 512Mi
  requests:
    cpu: 250m
    memory: 256Mi

ingress:
  enabled: false

hostNetwork: true

service:
  port:
    port: 8123

dnsPolicy: ClusterFirstWithHostNet

persistence:
  config:
    enabled: true
    emptyDir: false
    existingClaim: "homeassistant-pvc-data"

dnsConfig:
  nameservers:
    - 192.168.178.21
    - 192.168.178.1
Once the YAML file is created, we can add the repo for the helmet chart and install the helmet chart:
helm repo add k8s-at-home https://k8s-at-home.com/charts/
helm repo update
helm upgrade --install home-assistant k8s-at-home/home-assistant -f values.yaml
IngressRoute
In the IngressRoute for Home Assistant, we specify that only internal IP addresses are allowed to access the service.
apiVersion: traefik.containo.us/v1alpha1
kind: IngressRoute
metadata:
  name: home-assistant-ingress
spec:
  entryPoints:
  - web
  routes:
  - kind: Rule
    match: Host(`home-assistant`)
    middlewares:
      - name: private-ips
        namespace: kube-system
    services:
    - name: home-assistant
      port: 8123
Once the IngressRoute has been created, a local DNS entry for Home-assistant must be created in Pi-hole so that the service can then be called via the specified host name.
Wordpress Blog
The next application we install in the cluster is a public WordPress blog. We split the setup for the blog into two parts: First we install the Maria-DB database, and then we install the WordPress application. The reason for the split is that we want to use the database also for other applications in the cluster.
MariaDB
We will first create a persistent volume claim for the database, where the data are stored:
apiVersion: v1
kind: PersistentVolumeClaim
metadata:
  name: mariadb-pvc
spec:
  accessModes:
    - ReadWriteOnce
  storageClassName: longhorn
  resources:
    requests:
      storage: 5Gi
The installation takes place again via Helm Chart, which is why we have to create a YAML file with the settings. We put the root-password in the YAML file and refer to our persistent-volume-claim. The Helm chart offers the possibility to create a database including the corresponding user during the installation. Alternatively, you can create the database and the user yourself later.
service:
  type: ClusterIP
  port: 3306

# Resource limits and requests
resources:
  limits:
    cpu: 1000m
    memory: 1024Mi
  requests:
    cpu: 300m
    memory: 512Mi

## Database configuration
settings:
  ## The root user password (default: a 10 char. alpahnumerical random password will be generated)
  rootPassword: rootPasswort

## Optional user database which is created during first startup with user and password
userDatabase: {
  name: wordpress,
  user: wordpress,
  password:
}

## Storage parameters
storage:
  ##  Set persistentVolumenClaimName to reference an existing PVC
  persistentVolumeClaimName:  mariadb-pvc
Once the YAML file is created, you can install the database with the Helm Chart:
helm repo add groundhog2k https://groundhog2k.github.io/helm-charts/
helm repo update
helm upgrade --install mariadb --values=mariadb-values.yaml groundhog2k/mariadb
Application
We also need a persistent volume claim for the Wordpress application itself, where plugins, photos, etc. will be stored later:
apiVersion: v1
kind: PersistentVolumeClaim
metadata:
  name: wordpress-pvc
spec:
  accessModes:
    - ReadWriteOnce
  storageClassName: longhorn
  resources:
    requests:
      storage: 20Gi
Once the persistent volume claim is created, we once again use a helmet chart to install the application. And like with the database, we create a YAML file beforehand. In this we define the rollout strategy, some WordPress settings, the persistent-volume claim and the credentials for the database. The username and password for the database must correspond to the previously defined data:
## Default values for Wordpress deployment
strategy:
  type: Recreate
service:
  type: ClusterIP
  port: 80

## Wordpress specific settings
settings:
  ## Database table name prefix
  tablePrefix:
  ## Maximum file upload size (default: 64M)
  maxFileUploadSize: 200M
  ## PHP memory limit (default: 128M)
  memoryLimit: 512M

resources:
  limits:
    cpu: 500m
    memory: 512Mi
  requests:
    cpu: 250m
    memory: 256Mi

## Storage parameters
storage:
  ## Set persistentVolumenClaimName to reference an existing PVC
  persistentVolumeClaimName: wordpress-pvc

externalDatabase:
  ## Name of the database (default: wordpress)
  name: wordpress

  ## Database user
  user: wordpress

  ## Database password
  password:

  ## Database host
  host: mariadb
Once the YAML file is created, the application can be installed:
helm upgrade --install blog --values=wordpress-values.yaml groundhog2k/wordpressIn order to operate the blog via HTTPS, a certificate must be generated via the Cert Manager, and for this we define a Certificate object:
apiVersion: cert-manager.io/v1alpha2
kind: Certificate
metadata:
  name: secure-wordpress-cert
spec:
  commonName: example-blog.com
  secretName: secure-wordpress-cert
  dnsNames:
    - example-blog.com
  issuerRef:
    name: letsencrypt-prod
    kind: ClusterIssuer
Now everything is ready to create the Ingress routes (HTTP and HTTPS) for the WordPress blog to reach the blog from the outside:
apiVersion: traefik.containo.us/v1alpha1
kind: IngressRoute
metadata:
  name: wordpress-http
  labels:
    app: wordpress

spec:
  entryPoints:
    - web
  routes:
    - match: Host(`example-blog.com`)
      kind: Rule
      services:
        - name: blog-wordpress
          port: 80
      middlewares:
      - name: https-only
        namespace: kube-system
---
apiVersion: traefik.containo.us/v1alpha1
kind: IngressRoute
metadata:
  name: wordpress-https
  labels:
    app: wordpress

spec:
  entryPoints:
    - websecure
  routes:
    - match: Host(`example-blog.com`)
      kind: Rule
      services:
        - name: blog-wordpress
          port: 80
      middlewares:
      - name: security-header
        namespace: kube-system
  tls:
    secretName: secure-wordpress-cert
The WordPress blog should now be accessible via the defined domain.
Summary
In this post, we've covered the basics for a handful of applications and installed a few sample applications as well. Most of the applications can be installed using the same scheme, and installing them with a helmet chart removes a lot of the work. In further posts on my Raspberry Pi Kubernetes cluster, I will cover topics such as Function-as-a-Service (FaaS), monitoring and security.